Skip to content


Lucene.NET index building – Week 3

This week I continued on my proof of concept project, and more specifically looked at ways of indexing the knowledge base articles in order to be able to search them and identify similar articles. There are many libraries and tools built for this, and one that I investigated early on was called gigablast. This system is built for linux, and integration with my .NET project was difficult. I decided instead to look into options native to .NET. The solution I found and integrated with my project is called Lucene.NET, and is an indexing tool originally written in Java, then later ported to C#. This tool indexes items and saves this index to disk where it can then be read at a later time by any application using Lucene with access to that disk space.

Once I had indexed the knowledge base, I then began to investigate other features of Lucene, such as the search features. I created a search function that uses Lucene to search the indexed articles, looking for articles containing exact matches to the search term. I then extended this to use fuzzy queries, where matches that are a set number of edits away from the search term are also returned. For example, if someone were to search VPM instead of VPN, that would count as being one edit difference and therefore with a fuzzy query allowing at least one edit difference a search for VPM would still match with VPN. This is a really useful feature to have, especially with less technical users who may misspell important terms. Once I’d investigated with different search features, I then looked into adding further functionality to my web application by providing links to related articles at the bottom of article pages. This was interesting to play around with, comparing similarities in the title and in the main body of text, with both a standard analyzer and a snowball analyzer, comparing which resulted in more relevant articles being identified. The standard analyzer identifies terms and counts their frequency. A snowball analyzer does the same, only it allows for stemming of words, so the terms print, prints, printing, and printers are all identified as being the same word. There are drawbacks to the snowball analyzer, also identifying terms like organization and organs as being the same, so allowing for more mismatches in some cases. Despite this drawback, I found the snowball analyzer to do a better job in most cases at identifying similar articles, and just comparing titles to give more obviously similar results, whereas comparing the main body of text sometimes returned results that weren’t immediately obviously similar to the given article.

The next step for my web application was to make it look professional enough to possible be an outward facing application by applying the university branding rules to it. I was given a link to the new university branding guide, https://www.southampton.ac.uk/brand/. This website lists in detail how to brand posters, choose fonts, and even how to advertise the university on the side of a mini-bus, but very little on how to create a university of southampton website. I decided, instead, to use the source code of the branding website as a kind of template, and to try to integrate it with my existing web application. This proved more difficult than I originally anticipated as the website wasn’t designed to be pulled apart and reused for a different purpose, but eventually I ended up with a website that looked vaguely professional. There are still a few small bugs such as the navigation menu moving up half a centimetre when you hover over it, and the title shifting downwards if you hover over the breadcrumb links just above it, but all in all the web application is starting to look more clean and professional.

Capture

The next steps are to iron out those little visual bugs, probably moving the breadcrumb links as they’re not in a very aesthetically pleasing place at the moment, and ensuring this style works for article pages too. From there, I’d like to get other people’s opinions of the website, to see if they find it more or less useful than the existing knowledge base browser, and to work out how it can be further improved.

Posted in Programming.

Tagged with , , .


Open Data Internship – Week 2 – Dusting off old skills

He ran his fingers across the dust console leaving a trail of clear glass showing the controls beneath. He paused. It had been quite some time since he had last flow this ship, so he took a moment to try and remember the controls. Gingerly he tapped some of the buttons. An explosion echoed through the ship and an alert displayed on the console, “Uncaught TypeError: Cannot read property ‘id’ of undefined”. “Hmm, how about this?” he mused tapping the console again, this time the bridge came to life.

This week has seen me dusting off my JavaScript skills in the aid of making a route finding map prototype for campus. So in its simplest terms this is a graph traversal problem. But before I jumped into coding a graph traversal algorithm I needed to find some way to represent the map. The form I decided on was reasonably simple, I only modelled the nodes and these nodes had the properties of a unique numerical ID, a label for describing the location, a geometric point, and a list of nodes to which it was connected. I decided upon this because it allowed for one-way edges which could represent exit only doors.

Next came the implementation of the graph traversal. The method I used was a modified Breadth-First search which instead of enqueuing newly explored nodes to end a queue, I instead inserted them into an array which was ordered by cost (distance) travelled, and the least travelled node was expanded next.

The underlying data I was using was a list of university building entrances, but this list was incomplete and also didn’t help with navigation as just drawing a line from one door to another will not help anyone navigate anywhere unless they can fly. So I manually created intermediate nodes on paths and crossings, typically where the path forked or crossed a road. As I was only making this data for a prototype I did it sporadically and just arbitrarily picking a spot on the route I was trying to add and working from there, but on I decided  this was not a good way to move forward once the main program was working so I spent time using GIMP2 to simplify a university map down to the elements I needed to see to decide where to place nodes.

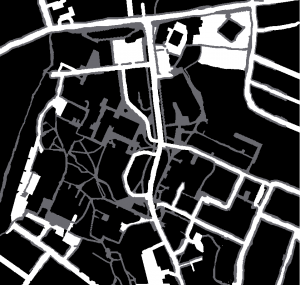
I started with this Map:

A map of the University

Then spent time reducing the colour of the image, primarily using tools such as Posterize, which reduces the number of colours in an image, and the ‘Select by Colour Tool’, which I would use to select an all a specific colour on the map and recolour it all. After several hours of this and some manual cleaning up of the image I produced this three colour Map:

Three colour map of the Univercity

Here we see roads in white, paths/paved areas as grey and impassible areas (grass and buildings) in black.

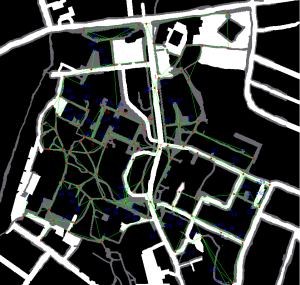
Now it was a matter of adding nodes to the map, I started by adding blue dots to represent doors and then added red dots for forks in paths and road crossing. Finally I connected these nodes with green lines to represent traversable paths. This gave me this map:

3 colour university map with simplified overlay.

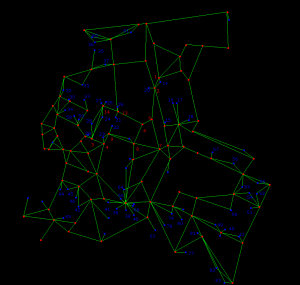
Now that I had the graph I could remove the underlying map and see the graph I had created:

A graph representation of campus

Which I personally think looks quite nice, but more importantly will allow me to expand upon the data in my prototype in a logical and well thought out way.

Posted in Geo, Javascript, Programming.

Tagged with .


Open Data Internship – Week 1 – The code Jungle

Wandering through the ruins of this civilisation I come across a strange totem in the middle of the road, it makes no sense for it to be there so I examine it closely, its secrets no closer to being uncovered. Then I notice a small plaque, with some prehistoric writing on it, I was previously unaware that this civilisation had mastered writing so I eagerly tried to read it “//Down here as PHP 5.5 or less doesn’t support expressions as initializers.” And suddenly the totems position made sense.

It is my first week here in the Technical Innovation and Development team working as an open data intern, and whilst looking for a starting point for my time here I decided to look to the past and see what last year’s intern did with their time here. Conveniently they wrote a pseudo-weekly blog about their time here and so I settled down with a cup of tea to read what they had done. This went well for about the first five minutes until I came a sample of a SPARQL query. I had never seen anything quite like it before so I started investigating. SPARQL is an Resource Description Framework (RDF) query language, I understand RDF to be a format by which data is expressed as Triples containing a ‘subject’, ‘predicate’ and ‘object’. The ‘subject’ is a reference to the object being described such as ‘buiding32’, the ‘predicate’ denotes a type of the ‘object’ such as ‘residential’ and the ‘object’ denotes a value such as ‘false’. Having never come across either RDF or SPARQL before it took a little while to get my head around this but I got there in the end and building on what was done last year I was able to retrieve information about what buildings on campus do not have images or geo-data in the university’s University ‘Building’ Open Data Set, removing all members of the ‘Item Hidden from Lists’ Data set. I achieved this using the MINUS operator which was implemented in SPARQL 1.1, which allows for the elements in set A which are also in set B to be removed from set A in the case ‘A MINUS {B}’.

The second thing I have worked on this week was working my way through the source code of the data gathering app that last year’s intern wrote, available here. Doing this made me feel a bit like a new age explorer as a whilst the application seems well coded, comments are few and far between which can leave me wandering through the jungle of code longer than necessary and underlines the need for well documented code to improve the lifespan of it. This was particularly frustrating when I was starting out and having hosted a local server on my machine and was trying to get the app to run I was running into a large number of database related problems. I eventually found the problem by sifting through error logs which were complaining that the mysql libraries were unavailable. This was because I was using PHP 7, and these libraries were removed in PHP7 having been deprecated in PHP5.5 for security reasons. Putting the original code on a server with PHP5.5 solved all the database connection problems and made the app functional again. I am now going through and trying to replace these mysql references with mysqli ones instead to improve the quality of code.

Posted in Open Data, PHP, SQL.

Tagged with .


Working with the Service Now Rest API – Week 2

To follow the theme from last week, a large portion of my time this week was spent learning about new technologies I haven’t used before. I was taught about dependency injection, something I’d heard about a lot but never really gotten to grips with. I think this will be a tough thing to use in my own work at first, as it requires a bit of a change in thinking. Aurelia is used for front end web development within the team, and I got to see it being used and contribute to the development of a web view for the Lab Marks system with Kevin. For my own personal project, which I’ll talk about soon, I learnt how to use the Service Now Rest API, and even a little bit of web crawling. I also had a little bit of time to dig into a new book – Clean Code by Robert C. I’ve thoroughly enjoyed reading up on these things, and reading Clean Code in particular, and I’m looking forward to putting some of these things into practice with my own work.

This week wasn’t all about reading, however – I got the chance to join a team briefing and to start work on my own personal project. The team briefing was interesting to see, and it was refreshing to see that people within iSolutions really do care about what the students want and need. It was great to be able to add a fresh perspective and talk about issues I’ve experienced from outside the organisation as an undergrad and as a prospective PhD student. It also gave me a better overview of the team and their role within iSolutions, the direction they’re heading in in the long term and why.

And most excitingly, I got to start work on my own project. I’ll be designing and making a small proof of concept system that makes the University of Southampton knowledge base easier to access and specific articles easier to locate. The idea is to help ease the work load for the service desk who may be answering generic questions that have already been thoroughly answered and explained online. As a student, I’ve never used the knowledge base before, and when I had the idea to make an intuitive question answering service I didn’t realise that one already existed. This needs to change, and a more open google-able system could do that. To start my project off, I investigated how to use the Service Now Rest API to extract knowledge base articles to display in my own web application. I managed to do this, and now have a web application that has an index page that loads all the knowledge base articles into a list in a table with links to the article details page. The article details page takes an article number as a parameter in the url, and will display a short description and the given text for that article in browser. It’s a very basic set up for now, but I feel like it’s a good starting point. The next steps for my project include investigating web crawling to make the knowledge base searchable, and investigating adding features such as related pages.

Posted in HTTP, Programming.


Starting out on my summer internship – Week 1

My first week with the iSolutions Technical Innovation and Developments team was an interesting start to my 12 week internship here. With the team in the early stages of two new projects, there was little for me to contribute straight off the bat besides a small amount of requirements capture and some wire frame drawing. Instead, I took the opportunity to get to grips with some of the new technologies I’ll be using for the next three months. I’ve never gotten very involved with web development and database frameworks, but the tools I’ve been investigating have proven themselves to be more simple (and dare I say fun?) than I had anticipated.

Firstly I re-familiarised myself with .NET. C# was was one of my first programming languages, taught to me for my computing A level, and whilst the iSolutions projects I’ve seen are much more complex than any of my A level courseworks, it still feels friendly and familiar coming back to it. Building upon that basic knowledge of .NET, I then learnt about code first entity frameworks from David, and began working on online tutorials to create an MVC entity framework based web application.

Naturally, my first week also exposed me to some web design, starting with a talk from Chris. This talk was a test run for a web conference next month, and was aimed at people with little to no experience with the technical side of the web at all. Whilst I come from a technical background, I’d never done web development before, so the front end web development side of the talk taught me a lot. Delving into online tutorials on the topic, I started to really enjoy playing around with html and css.

I’m excited to see where the team’s two new projects will go when they start to take off, and to use some of my newly learnt skills to contribute towards them.

Posted in Database, Programming.

Tagged with , , .


Science and Engineering Family Day: Minecraft Engineering Report

 Last Saturday (18th March, 2017), I ran the “Minecraft Engineering” activity at the Science and Engineering Day.

Useful links and downloads are included in the updated post about it from 2016.

We were co-located with the Minecraft implementation of the model railway, which connects ways the university research intersects with railways. The model was built by the talented young Joe Roberts, who ran a bay of 10 computers for the entire 6 hours of the event.

My activity was run on 20 machines supported by a volunteer named Jamie Scott, and myself.

What went well?

  • 2017-03-20_11.42.38

    Southampton Town Quay from Open Data – Rendered with Optifine and Sildurs Vibrant Shaders

    Both Jamie and Joe were tireless in their patience, enthusiasm and professionalism working with the hundreds of families passing through in the day. Both of them dealt with technical issues in a calm and effective way. Their combination of talent and can-do should take them far in life.

  • Using desktop machines with mice rather than laptops: Lack of mice was a big problem last year (we had some but not enough), and transporting 12 expensive laptops added to the stress at the start and end of the day. Our very nice desktop support people got it all installed very nicely.
  • Purchasing Minecraft accounts with logical usernames, rather than last year when we borrowed accounts from everyone we could, which made setup complex.
  • Optifine; this is a mod which lets you use “shaders” which make everything look pretty; shadows, reflections on the water, rays of sunlight. This showed off our expensive hardware nicely.
  • Jamie created a server with all my maps on using “bungee” which let people walk through portals into different worlds. This meant we didn’t need to copy a memory stick of save files onto every machine and gave a smoother interface for the children.
  • Rather than last year’s laminated cards, I printed all the notes in 10 booklets. A few people wanted to take them home, but I agreed to put a PDF online, and the front page had a URL of last year’s blog post, where I put a link so they could just photograph or write that down.
  • My 3D models of cities from open data gave families a nice A-ha moment.
  • The Gong: last year we used electronic 15 minute timers on each machine, which were switched down to 10 minutes due to queues. It was certain some sneaky kids were pausing their timers, or up to other shinanigans (like I would at that age). This year we tried starting sessions every 15 minutes and ending them with a large gong I happened to have in the garage. It worked really well and there were very few arguments or sulks as a result.
  • Packing up was really quick. Although there was some custard powder on the floor (sorry cleaners).

What was a mixed bag?

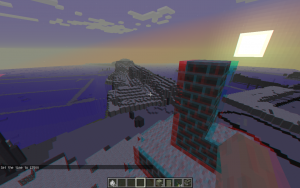
  • 3D Anaglyph

    Southampton Town Quay from Open Data – 3D Anaglyph

    I planned to set up 10 machines with Optifine, and 10 with cyan/red 3D glasses. Some people loved the 3D glasses, other people hated it, others wanted to see it but then wanted to change back so we ended up navigating those menu options 50 times at least.  I took 125 of the cheap glasses and finished the day with about 75 left. I was fine with people taking a set of these home if they wanted as they are £2.00 for a pack of 10 (plus postage).

  • The “lobby” on Jamie’s server was a bit too big, and it wasn’t quite clear what to do. Jamie made a portal to a default “survival” world, which meant that if we didn’t guide people, the kids just headed for that and messed around for 15 minutes. More volunteers would have smoothed that issue, but if we had it over I’d make the portals much more simple and close together, and not offer the survival world option or any PvP!
  • Initially people couldn’t teleport on the big city maps, which Jamie managed to fix. We also shifted those maps into full creative, which ended up with Elizabeth Tower (big ben) covered in lava, and the lawn at Buckingham Palace having a few TNT crators, but this helped show that these maps were interactive and very big “play mats” rather than static demos behind glass.
  • The Redstone map seemed to go OK with those who tried it. Jamie set up a very clever mode where the demonstation was fixed (they couldn’t break it) but they could walk out into the wilderness and build their own things. That’s an idea I’d like to take further another time.
  • We had a bit of a panic that when we tested multiplayer on Friday, the machines gave a windows firewall warning about network access, but after a bit of prodding it seemed we could still connect to external servers. My best guess is that the multiplayer screen also attempts to listen on the local network for servers, and that triggered the warning. So a storm in a teacup, but worth mentioning in case it bites someone in future.

What didn’t work?

2017-03-20_11.43.20

Southampton Town Quay from Open Data – Normal Minecraft rendering

  • We didn’t have enough staff to do this to the standard I’d have liked. The 3 of us were more or less flat out for 6 hours, and that’s not reasonable. I tried to eat an apple and it went brown in between bites.  ECS volunters were down in general, but one more person would have let us take breathers. Next year, if we do this again, I must make much more of a campaign to get helpers.
  • I should have had fliers to take away with information and how to get in touch etc. We did that last year.
  • My “Minecraft Archaeology” map requires too much explanation to be suitable for this envioronment. It might work better in a classroom setting, but the only child who got into it was one who’s father was with him and already understood the purpose of that map from an earlier conversation.
  • Registering Minecraft accounts enmasse is a nightmare. The online options do not let you buy more than between 2 and 5 before it triggers something that stops you buying any more on that card. In the end I got a lot of scratch cards from ASDA, and even then there was a maximum of 5 on each transaction! We had a look at the educational version of Minecraft, which is much easier to get bulk licenses for, but it’s incompatible with normal Minecraft (it’s the dreaded microsofted version) so you can’t load normal maps, can’t convert them, and can’t use mods or anything else that makes life interesting.

Overall we did very well, but could have done better with more planning, preperation and staff on the day.

Apparently feedback from the larger event was it was so big that people couldn’t do it in a single day, and could we make it two days next year? I don’t think I could physically manage that without a holiday afterwards!


Posted in Uncategorized.


Student Open Data Antipattern

I’m writing this post to highlight a recurring anti-pattern I’ve seen when people new to the open data field are asked to come up with a project for a coursework, group project, or hackathon.

What happens time and time again is that people set their heart on an idea which requires data which is just not available. At http://data.southampton.ac.uk/ we make every effort to provide all available data in a timely and linked way. If it’s not there it’s because we don’t have access to it, we don’t have the right to publish it, or it doesn’t exist.

Often we are requested data such as class timetables, and this is getting very close to data about people, and therefore we are far more cautious about it, as we have a duty to protect our students’ privacy. We hope one day to find a way to provide secure & consent based API access to such data, but it’s a bit of a pipedream.

Other datasets people have requests just don’t exist. This summer our open data intern was sent on a mission to create a dataset of all building entrances, as amazingly there was no such dataset that we could locate! Our “Buildings and Estates” department are very helpful, but their system thinks in terms of site/building/room, so we had to build our own dataset which was a lot of time and effort, but worth it as buildings and building entrances hardly alter year on year. You can see the new building entrances layer on Ash’s interactive university map. (Click them to see a photo!)

If wishes were open data we’d all have full harddrives, but they’re not.

The lesson here is that we need to better communicate to open data newbies that it is unwise to plan a project which requires data you don’t know to be available. If it’s not available, it’s virtually certain there will not be enough time to make it available in the hours, weeks or months of your project.

We need to teach our students and hackathon participants:

Don’t start from the application you want to build and looking for open data that “should be”.

Start with the data that is there, and invent the application that can be!


Posted in Best Practice, Open Data, Training.

Tagged with .


HESA Open Data Consultation Summary

In the summer I wrote a contribution to the HESA open data consultation.

The summary of the consultation has now been released (PDF)

Posted in HESA, Open Data.


Internships the TID way

For the last two summers TID has had interns and so will it go next summer. I learned the value of having interns in my previous role and would strongly recommend it. Interns give you lots of advantages which are quite hard to get in your regular team.

  • Fresh perspective and new ideas
  • Current degree level education
  • More capacity for non critcal tasks
  • Great test of your induction materials

However nothing in life is free and to get these great benefits you have to make an internship experience which attracts good interns without causing too much upheaval to your team. Interns when managed badly can be a cause lots of surprise extra work (my least favorite kind of extra work). To mitigate this risk we are careful about the workload we allocate to interns.

When we have an intern the body of their 12 weeks of work is roughly divided into thirds.

  1. I plan for them to spend 1/3 of the time working on a project in the team. This gives them plenty of chance to see how we work and learn the TID way. They will work on a real piece of project work which ships to customers and the work will be reviewed and structured by the technical lead to ensure the quality is high. We do not factor the interns time into project estimates because generally the time they save is spent answering questions and reviewing the work.
  2. 1/3 of the time will be spent on a solo project. This will be a stand alone project which is chosen based on the interns rough preferences. Some times this will be an investigation piece or a piece of software for internal use in the team. It can be a customer facing product but only if it is non critical in every way. Work which we would decline because it is not important enough is a good candidate for this. Interns are not full members of staff and they lack professional experience so it would be foolish to entrust them with significant responsibility. They will usually get support from a team member in collecting requirement and technical guidance or review of their work. This gives them a chance to learn in way which has few negative side effects to us but gives them control and independence.
  3. The final third of the time will be spent doing dogsbody work. This is the kind of work that requires little thought or input but still has to be done. It is often data entry or data collection, it is not very glamorous but someone has to do it. It is a helpful thing for interns to do because it shows them not all our work is fun or exciting and it is something they can get on with when they are waiting for help from a busy team member. It is also a lot cheaper for us to have the intern doing this than a software engineer.

One other weekly tasks I like interns to do is write a blog post on this blog. It helps them reflect on the purpose of their work and hone there writing technique. It lets me know when they haven’t really understood what they are doing or why and can also be used as a showcase to their future employers. In recent years it has also been used to advertise our internship program to new potential interns. You can read some past blogs here:

Over the years interns have provided the team with new project ideas, introduction to technologies to new and great management experience for team members. They don’t save that much work so don’t time budget them as a full member of staff. Temper the work load with non-cricical and sometimes uninteresting tasks and you can get good value out of an intern while they get good experience in return.

Posted in Best Practice, Management, Outreach, Recruitment, Team.


Unit testing Aurelia service code

Aurelia is one of a crop of new front end JavaScript frameworks that make it easier to manage complex interactions in the browser. It implements a MVVM pattern and includes routing, dependency injection etc.

Unit testing Aurelia custom elements and attributes is described in the Aurelia docs (http://aurelia.io/hub.html#/doc/article/aurelia/testing/latest/testing-components. However, more general testing of business logic or service code is not discussed. This article gives a basic introduction to testing these classes using the Aurelia CLI.

  1. What libraries are included in the CLI, what do they do?
  2. Writing a basic test
  3. Running tests
  4. Improving the test output
  5. Debugging tests
  6. Mocking in tests
  7. Testing code with promises.

Note: Aurelia supports the babel.js and Typescript transpilers. The code examples below are in Typescript but should be readable for anyone who is familiar with modern javascript.

1.      What libraries are included in the CLI, what do they do?

When creating an Aurelia project using the CLI the following testing libraries are included:

  • Jasmine – popular BDD JavaScript testing framework. Provides the test structure and asserts.
  • Karma – test runner. Allows you to run the tests from the command line and debug the tests within a browser.

Angular Protractor and selenium web-driver tests are also included – they are used for end to end testing and so not discussed in this article.

2.      Writing a basic test

Test classes are placed in the /tests folder and should include spec in the title e.g. articleStore.spec.js. The test class should include the following elements.

Import referenced classes

Import the class under test (and any other relevant classes) at the top of the test class e.g.

Import { ArticleStore } from ‘../../src/articles/ArticleStore’;

Create a top level describe function.

Create a describe function that indicates the name of the class under test as a string and the details of the tests as an argument e.g.

describe(‘the ArticleStore’, () => {…});

Note: The text ‘the ArticleStore’ will then be outputted when we run the tests.

Create a test setup

As with most testing framework Jasmine provides a mechanism to run setup and teardown code before/after each individual test. This is achieved by creating a beforeEach/afterEach function that takes a function as an argument.

In this example we will use this to create an instance of the class under test before each test is run e.g.

let target: ArticleStore;

beforeEach(() => {

      this.target = new ArticleStore();

});

Create a test

To create the test itself we create an it() function which takes the name of the test as a string and the test code as an function argument. Again, the name of the test will be outputted by the test runner.

The test itself makes use of the Jasmine asserts to confirm expected state.

e.g.

it(“should have an empty articles collection”, () = {

      expect(this.target.Articles).not.toBeNull();

      expect(this.target.Articles.length).toBe(0);

});

3.      Running tests

To run the tests issue the following statement from a command prompt:

au test

This invokes the Karma test runner to run any tests it finds in files ending spec.js and outputs the details of any tests that have failed.

“au test” will run the tests once, report the output and close. However, as with the “Aurelia run” command you can include the watch argument:

au test --watch

This will run the tests, report the output but not close. The test runner will maintain a watch for any changes to code and when new code is saved will rerun the tests and display the new output.

4.      Improving the test output

The default configuration of Karma within Aurelia will only report failing tests. To get a comprehensive list of all tests that were run make the following change to the /karma.conf.js file:

Change this:      reporters: [‘progress’],

To this:               reporters: [‘spec’],

5.      Debugging tests

Karma makes debugging quite easy as it creates a browser instance and allows you to use the standard in browser debug tools (F12). As well as being simple to use, debugging in the browser is more accurate than debugging in an IDE or similar, as it will correctly replicate any browser issues.

To debug from the Karma test runner:

  • In the command prompt run: au test –watch
  • A browser spins up. Click the ‘Debug’ button in the green bar on the top right.
  • A new tab opens with the unit tests loaded. Press F12 to open developer tools, view the source, add breakpoints etc. as normal and press refresh to re-run the tests and hit the breakpoints.

6.      Mocking in Aurelia tests

Mocking is an important part of any unit testing strategy. Currently the standard tool for mocks/stubs/spies in Javascipt is to use the sinon.js library. However in my experience this did not play well with Jasmine.

An alternative, simpler and more modern mocking library is called TestDouble (https://github.com/testdouble/testdouble.js) . This can be imported via NPM.

Import the testdouble package

npm install testdouble –save-dev

Add testdouble as a vendor-bundle dependency.

This is optional but adding the following to the dependencies section of the /aurelia-project/aurelia.json file, vendor-bundle dependencies section makes regularly including the testdouble library within test classes simpler as you can refer to it with a simple name rather than needing the relative path.

{
        "name": "testdouble",
        "path": "../node_modules/testdouble/dist/testdouble"
}


Import TestDouble in your test class

Import * as TestDouble from ‘testdouble’;

Note include the relative path if you did not complete the previous step


Create/Destroy the mock objects

Within the test code create a variable for the object being mocked, with the type of the object being mocked e.g. if we are mocking a class of type ApiConnector

let apiConnector: ApiConnector;

Initialize the mock on the beforeEach() method, and call TestDouble.reset() on the afterEach() method e.g.

beforeEach(() => {
      this.apiConnector = TestDouble.object(ApiConnector);
});
afterEach(() => {
      TestDouble.reset();
});


Setup and/or verify the mocks within the tests

It(‘getStatus should return the updating status from the apiConnector”, () => {

      // setup the mock
      let knownStatus = “cached”;
      TestDouble.when(this.apiConnector.getStatus).thenReturn(knownStatus);

      // make the call under test
      Let result = this.articleStore.getStatus();
      
      // assert the mocked result is returned and the call was made on the mock object
      Expect(result).toBe(knownStatus);

      this.articleStore.verify(getApiStatus);
});


7.      Testing code containing promises

Asynchronous code is very common in the JavaScript world and a modern approach to implementing async code is to use promises. Asynchronous code and promises requires some minor changes in testing approach.

To handle async code Jasmine takes an optional argument to the it(), beforeEach() and afterEach() methods called “done”. The “done” argument is a method that should be called once all other test code has completed. When using a promises approach to asynchronous code this would typically be at the end of the last “then” call.

The following code gives an example of creating a promise object and returning this promise from a mocked method. This is a common scenario e.g. where an ajax call which returns a promise needs to be mocked.

For a promise to be processed either its resolve or reject method should be called. In this example the mock returns a promise that has a resolve method and the test asserts that when that promise is successfully resolved the refreshAll method returns a promise with the data true.


it("refreshAll returns a promise with data:true when api call successful", (done) =>  {
       // arrange       
        let promise = new Promise((resolve, reject) => { resolve("Success data"); });

        TestDouble.when(this.apiConnector.getMany()).thenReturn(promise);

        // act
        let result = this.articleStore.refreshAll();

        // assert
        result.then(data => {
            expect(data).toBe(true);

            done();
        }); 

    });


Complete example code

As a summary, I have included below a complete example of an Aurelia test class which mocks promises:

import { ArticleStore } from '../../../../src/resources/data-service/ArticleStore';

import { ApiConnector } from '../../../../src/resources/data-service/ApiConnector';

import * as TestDouble from 'testdouble';

describe('the ArticleStore', () => {

    // setup

    let apiConnector: ApiConnector;

    let articleStore: ArticleStore;

    beforeEach(() => {

        TestDouble.reset();
        this.apiConnector = TestDouble.object(ApiConnector);
        this.articleStore = new ArticleStore(this.apiConnector);       

    });


    afterEach(() => {
        TestDouble.reset();
    });


    it("refreshAll returns a promise with data:true when api call successful", (done) =>  {
        // arrange       
        let promise = new Promise((resolve, reject) => { resolve("Success data"); });
        TestDouble.when(this.apiConnector.getMany()).thenReturn(promise);

        // act
        let result = this.articleStore.refreshAll();

        // assert
        result.then(data => {
            expect(data).toBe(true);
            done();
        }); 

    });

});

Posted in Uncategorized.