Over the Wednesday, Thursday and Friday of last week, the WAIS (Web and Internet Science) group held its annual WAISfest. This event is a chance for people in the group to explore side-projects and ideas they haven’t had time to do. The aim of the event is to get people thinking about possible areas of research. To stimulate some extra creativity, so to speak.
Luckily, I got to take part.
Wednesday morning began with the ideas unconference. The aim of this was to source ideas, loosely grouping people together to work on them. Ideas ranged from virtual reality workspaces to ways of teaching programming in schools using Microbits.
It was this latter project I hopped aboard, swayed by their stash of robotic buggies and a mountain of BBC Microbits.
Investigating the BBC Microbit
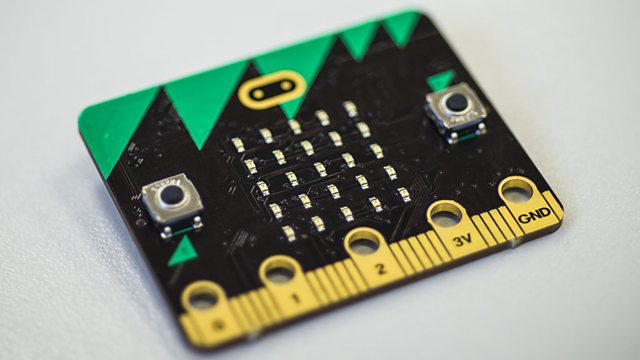
At the start of the project, I had no idea what exactly the Microbit was, let alone how to use it. We spent the first day of the WAISfest digging up information on how to use it. Hopefully, by posting this here, it’ll make someone’s life a little easier than ours was!
For those who don’t know, the Microbit is a low-cost embedded board given free to all year 7 students in the UK. It has an accelerometer, magnetometer, radio, GPIO pins and USB on-the-go. It’s able to be programmed in a variety of languages, including Python, Javascript, Microsoft Block Editor, Microsoft Touch Develop and C++.
Behind the scenes, all of these languages use the same core C++ library, published by Lancaster University. This library provides a simplified means to interact with the hardware.
The source code for the C++ library, MicroPython runtime and editor and Touch Develop are available at https://www.microbit.co.uk/open_source.
Getting Started with the Microbit
How to get started with the Microbit depends, in my opinion, on your level of experience:
- If you’re completely new to programming, try playing around with one of the online editors. They’re well documented, most coming with tutorials. Uploading your program is as simple as copying the file onto the board as if it was a USB drive.
- If you’re a bit more experienced, or want to do a medium-sized project, try using Mu and MicroPython. Writing longer programs (up to a few hundred lines) is pretty straightforward in MicroPython. Mu makes putting the file on the board significantly quicker.
- If you’re an experienced developer looking to do something complex, get the runtime and write using C++. There’s issues with using MicroPython for large projects I’ll get into in the next section.
We opted for the second approach, as we only had 3 days to produce a result. It’s also essential that kids and teachers could understand the code we were writing.
MicroPython for Microbit
“MicroPython is a lean and efficient implementation of the Python 3 programming language that includes a small subset of the Python standard library” – MicroPython Website
MicroPython is one of the languages available to program the Microbit. In my opinion, it exists as a middle ground between Javascript/Touch develop and C++. It’s useful for programs a few hundred lines in length, but struggles with anything larger.
Advantages:
- Derived from Python, a widely used programming language. Skills easily transferred to other platforms.
- Quick to upload to the Microbit. Deploying a new script takes seconds.
- Easier to debug than many other embedded languages, as error messages scroll across the Microbit’s LEDs.
- Editable, buildable and uploadable offline. There’s no need to use the BBC’s online editors.
- Avoids needing to understand memory management, as is the case with C and C++.
- Radio library provides a simple, minimalist interface to radio based networking.
Disadvantages:
- With scripts larger than a few hundred lines, the Microbit runs out of memory. This essentially imposes a limit on how long your program can be.
- Bluetooth isn’t available due to the memory usage of the Bluetooth stack.
- Unable to easily split code across files. Importing requires extra files to be flashed onto the Microbit each time a script is uploaded.
- Radio library only available in the Mu editor and not the BBC’s online editor.
Getting Started with MicroPython
There’s two main ways of getting started with MicroPython:
Using the online code editor.
The online editor is provided by the BBC. It provides the ability to write, edit and save code online and compile it for the Microbit. Uploading the code is as simple as clicking “Download” and copying the file to the Microbit. No installation of any software is needed, the editor runs in any modern browser.
While this editor is easy to use and fast to get started with, it has some downsides. To save scripts for later, you need to make an account and sign in. The editor also requires you to have a constant internet connection.
Another downside is, as of the date this was posted, it doesn’t support the Microbit ‘radio’ library, which allows Microbits to communicate with each other.
Using Mu
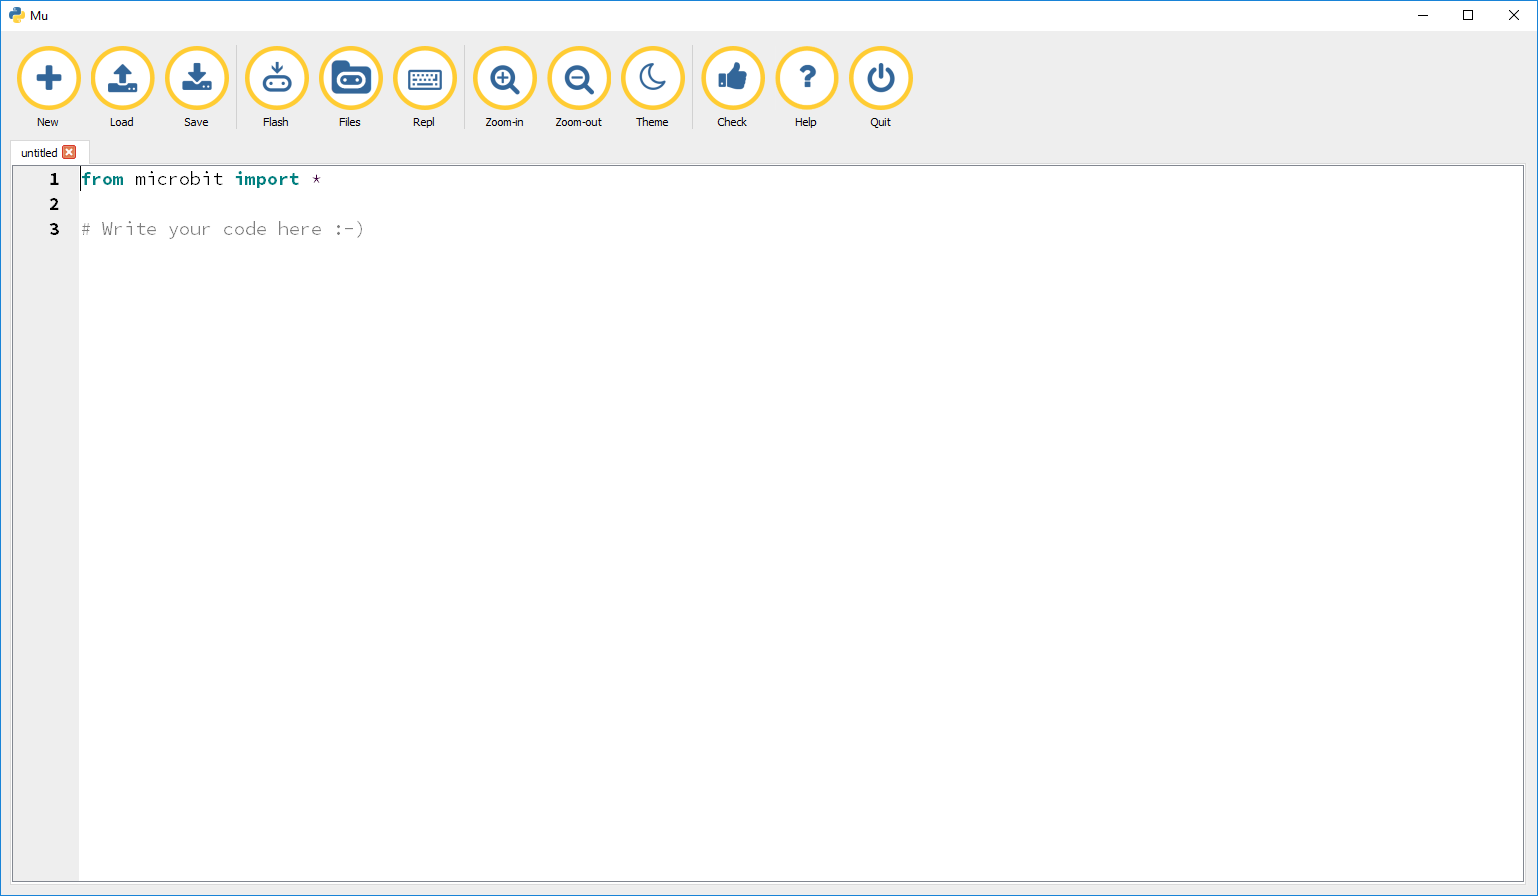
Mu is an offline, open source editor made by Nicholas Tollervey. You can write, edit and save code with it similarly to the online editor. However, files are saved locally, giving more flexibility about when you work and how you store the scripts.
The Mu editor also has several other features the online editor does not:
- Upload scripts to the Microbit by pressing a button
- Browse files stored in the Microbit’s flash memory
- Error messages output to the screen via “REPL”
- Syntax checking (identifying any errors)
- Tabs for editing multiple scripts
The downside is that the Mu editor needs downloading and running, something that may not be easy on many school systems. On Windows, the Mbed serial driver is also needed for file browsing and REPL functionality.
Unless you’re just having a quick play, I recommend Mu over the online editor. The extra functionality (especially REPL) is invaluable, as is the ability for more experienced developers to version control their scripts.
As for writing your first script… there’s plenty of tutorials on Python, and the syntax here is identical. Access to the Microbit’s hardware is provided by the Microbit library, with documentation available here.
Aside: Fixing the MicroPython Memory Error
When a MicroPython for Microbit script grows to a certain size, MemoryErrors start appearing. I’m not sure if the size is file size, or number of function/variable definitions. The error looks something like this:
MemoryError: memory allocation failed, allocating 1584 bytes
If this occurs, the simplest solution is to remove unused lines of code. Shortening variable and function names is an alternative solutions. Using long strings as comments exaggerates the issue, as they aren’t optimised out by the MicroPython runtime. This results in them using annoyingly large amounts of memory.
Another option is to try the online MicroPython editor. When compiled on there, I didn’t get MemoryError issues. I’m not certain why this is, but it seems to work!
Other Bits of Useful Microbit Info
- The online editors run a different version of MicroPython to Mu and the board firmware. In situations such as the “MemoryError” issue, different results can occur.
- The compass in the Microbit can’t be relied on for consistent bearings. It appears to be affected by any nearby cabling or bits of metal.


Hi Callum, I’m getting the memory problem using MicroPython on the online editor – why is this? The nRF51822 that the Microbit is based around seems to have plenty of program and data memory…have you managed to find a way around it since posting this?