In the summer I wrote a contribution to the HESA open data consultation.
The summary of the consultation has now been released (PDF)
Ideas and Tips from the Team
In the summer I wrote a contribution to the HESA open data consultation.
The summary of the consultation has now been released (PDF)
rev="post-1582" No comments
– January 4, 2017
For the last two summers TID has had interns and so will it go next summer. I learned the value of having interns in my previous role and would strongly recommend it. Interns give you lots of advantages which are quite hard to get in your regular team.
However nothing in life is free and to get these great benefits you have to make an internship experience which attracts good interns without causing too much upheaval to your team. Interns when managed badly can be a cause lots of surprise extra work (my least favorite kind of extra work). To mitigate this risk we are careful about the workload we allocate to interns.
When we have an intern the body of their 12 weeks of work is roughly divided into thirds.
One other weekly tasks I like interns to do is write a blog post on this blog. It helps them reflect on the purpose of their work and hone there writing technique. It lets me know when they haven’t really understood what they are doing or why and can also be used as a showcase to their future employers. In recent years it has also been used to advertise our internship program to new potential interns. You can read some past blogs here:
Over the years interns have provided the team with new project ideas, introduction to technologies to new and great management experience for team members. They don’t save that much work so don’t time budget them as a full member of staff. Temper the work load with non-cricical and sometimes uninteresting tasks and you can get good value out of an intern while they get good experience in return.
Posted in Best Practice, Management, Outreach, Recruitment, Team.
rev="post-1569" No comments
– October 27, 2016
Aurelia is one of a crop of new front end JavaScript frameworks that make it easier to manage complex interactions in the browser. It implements a MVVM pattern and includes routing, dependency injection etc.
Unit testing Aurelia custom elements and attributes is described in the Aurelia docs (http://aurelia.io/hub.html#/doc/article/aurelia/testing/latest/testing-components. However, more general testing of business logic or service code is not discussed. This article gives a basic introduction to testing these classes using the Aurelia CLI.
Note: Aurelia supports the babel.js and Typescript transpilers. The code examples below are in Typescript but should be readable for anyone who is familiar with modern javascript.
When creating an Aurelia project using the CLI the following testing libraries are included:
Angular Protractor and selenium web-driver tests are also included – they are used for end to end testing and so not discussed in this article.
Test classes are placed in the /tests folder and should include spec in the title e.g. articleStore.spec.js. The test class should include the following elements.
Import the class under test (and any other relevant classes) at the top of the test class e.g.
Import { ArticleStore } from ‘../../src/articles/ArticleStore’;
Create a describe function that indicates the name of the class under test as a string and the details of the tests as an argument e.g.
describe(‘the ArticleStore’, () => {…});
Note: The text ‘the ArticleStore’ will then be outputted when we run the tests.
As with most testing framework Jasmine provides a mechanism to run setup and teardown code before/after each individual test. This is achieved by creating a beforeEach/afterEach function that takes a function as an argument.
In this example we will use this to create an instance of the class under test before each test is run e.g.
let target: ArticleStore;

beforeEach(() => {

      this.target = new ArticleStore();

});
To create the test itself we create an it() function which takes the name of the test as a string and the test code as an function argument. Again, the name of the test will be outputted by the test runner.
The test itself makes use of the Jasmine asserts to confirm expected state.
e.g.
it(“should have an empty articles collection”, () = {

      expect(this.target.Articles).not.toBeNull();

      expect(this.target.Articles.length).toBe(0);

});
To run the tests issue the following statement from a command prompt:
au test
This invokes the Karma test runner to run any tests it finds in files ending spec.js and outputs the details of any tests that have failed.
“au test” will run the tests once, report the output and close. However, as with the “Aurelia run” command you can include the watch argument:
au test --watch
This will run the tests, report the output but not close. The test runner will maintain a watch for any changes to code and when new code is saved will rerun the tests and display the new output.
The default configuration of Karma within Aurelia will only report failing tests. To get a comprehensive list of all tests that were run make the following change to the /karma.conf.js file:
Change this: reporters: [‘progress’],
To this: reporters: [‘spec’],
Karma makes debugging quite easy as it creates a browser instance and allows you to use the standard in browser debug tools (F12). As well as being simple to use, debugging in the browser is more accurate than debugging in an IDE or similar, as it will correctly replicate any browser issues.
To debug from the Karma test runner:
Mocking is an important part of any unit testing strategy. Currently the standard tool for mocks/stubs/spies in Javascipt is to use the sinon.js library. However in my experience this did not play well with Jasmine.
An alternative, simpler and more modern mocking library is called TestDouble (https://github.com/testdouble/testdouble.js) . This can be imported via NPM.
npm install testdouble –save-dev
This is optional but adding the following to the dependencies section of the /aurelia-project/aurelia.json file, vendor-bundle dependencies section makes regularly including the testdouble library within test classes simpler as you can refer to it with a simple name rather than needing the relative path.
{
        "name": "testdouble",
        "path": "../node_modules/testdouble/dist/testdouble"
}
Import * as TestDouble from ‘testdouble’;
Note include the relative path if you did not complete the previous step
Within the test code create a variable for the object being mocked, with the type of the object being mocked e.g. if we are mocking a class of type ApiConnector
let apiConnector: ApiConnector;
Initialize the mock on the beforeEach() method, and call TestDouble.reset() on the afterEach() method e.g.
beforeEach(() => {
      this.apiConnector = TestDouble.object(ApiConnector);
});
afterEach(() => {
      TestDouble.reset();
});
It(‘getStatus should return the updating status from the apiConnector”, () => {

      // setup the mock
      let knownStatus = “cached”;
      TestDouble.when(this.apiConnector.getStatus).thenReturn(knownStatus);

      // make the call under test
      Let result = this.articleStore.getStatus();

      // assert the mocked result is returned and the call was made on the mock object
      Expect(result).toBe(knownStatus);

      this.articleStore.verify(getApiStatus);
});
Asynchronous code is very common in the JavaScript world and a modern approach to implementing async code is to use promises. Asynchronous code and promises requires some minor changes in testing approach.
To handle async code Jasmine takes an optional argument to the it(), beforeEach() and afterEach() methods called “done”. The “done” argument is a method that should be called once all other test code has completed. When using a promises approach to asynchronous code this would typically be at the end of the last “then” call.
The following code gives an example of creating a promise object and returning this promise from a mocked method. This is a common scenario e.g. where an ajax call which returns a promise needs to be mocked.
For a promise to be processed either its resolve or reject method should be called. In this example the mock returns a promise that has a resolve method and the test asserts that when that promise is successfully resolved the refreshAll method returns a promise with the data true.
it("refreshAll returns a promise with data:true when api call successful", (done) =>  {
       // arrange
        let promise = new Promise((resolve, reject) => { resolve("Success data"); });

        TestDouble.when(this.apiConnector.getMany()).thenReturn(promise);

        // act
        let result = this.articleStore.refreshAll();

        // assert
        result.then(data => {
            expect(data).toBe(true);

            done();
        });

    });
As a summary, I have included below a complete example of an Aurelia test class which mocks promises:
import { ArticleStore } from '../../../../src/resources/data-service/ArticleStore';

import { ApiConnector } from '../../../../src/resources/data-service/ApiConnector';

import * as TestDouble from 'testdouble';

describe('the ArticleStore', () => {

    // setup

    let apiConnector: ApiConnector;

    let articleStore: ArticleStore;

    beforeEach(() => {

        TestDouble.reset();
        this.apiConnector = TestDouble.object(ApiConnector);
        this.articleStore = new ArticleStore(this.apiConnector);

    });


    afterEach(() => {
        TestDouble.reset();
    });


    it("refreshAll returns a promise with data:true when api call successful", (done) =>  {
        // arrange
        let promise = new Promise((resolve, reject) => { resolve("Success data"); });
        TestDouble.when(this.apiConnector.getMany()).thenReturn(promise);

        // act
        let result = this.articleStore.refreshAll();

        // assert
        result.then(data => {
            expect(data).toBe(true);
            done();
        });

    });

});
Posted in Uncategorized.
rev="post-1564" No comments
– October 24, 2016
This is a quick idea that may already exist somewhere. Let me know if “there’s a vocab for that”.
We have a large set of images of our university buildings. There’s a variety of sizes & aspect ratios. Sometimes there’s more than one image of a building.
To render these in the university templates we need to trim them to certain sizes and aspect ratios. What would be useful is if we could store a “hint” of where the most important content is in the picture. For example take this image:

Clearly the most important part of this picture is the relationship between the researcher and the tool. I would say about here:

Which is about 36% from the left, and 50% from the bottom. What I’m wondering is if there is (or should be) some standard terms for indicating the focal point of this picture eg.
<http://example.com/pictures/research.jpg> ns:focalPointX "0.36"^xsd:float .
<http://example.com/pictures/research.jpg> ns:focalPointY "0.5"^xsd:float .
That way our HTML page generation can get cropped images but instead of a default focus (usually the centre point) it could know how to crop for this picture. You can see the results of making a portrait crop of this image using a focal point hint and without:
Without hint:

Using hint:

I think this makes a massive difference and seems like a really useful thing to optionally store with our images and publish as part of the metadata for them in the open data service.
Other useful metatags for images linked in open data would be:
Does this exist already somewhere out in ontology land? Are there any other useful things we should add?
Posted in Best Practice, RDF.
rev="post-1551" 1 comment
– September 19, 2016
Over the Wednesday, Thursday and Friday of last week, the WAIS (Web and Internet Science) group held its annual WAISfest. This event is a chance for people in the group to explore side-projects and ideas they haven’t had time to do. The aim of the event is to get people thinking about possible areas of research. To stimulate some extra creativity, so to speak.
Luckily, I got to take part.
Wednesday morning began with the ideas unconference. The aim of this was to source ideas, loosely grouping people together to work on them. Ideas ranged from virtual reality workspaces to ways of teaching programming in schools using Microbits.
It was this latter project I hopped aboard, swayed by their stash of robotic buggies and a mountain of BBC Microbits.
At the start of the project, I had no idea what exactly the Microbit was, let alone how to use it. We spent the first day of the WAISfest digging up information on how to use it. Hopefully, by posting this here, it’ll make someone’s life a little easier than ours was!
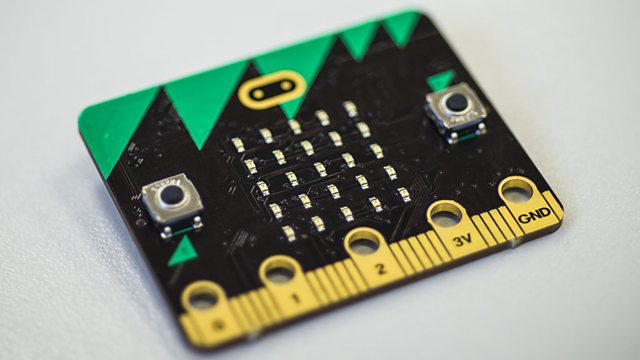
For those who don’t know, the Microbit is a low-cost embedded board given free to all year 7 students in the UK. It has an accelerometer, magnetometer, radio, GPIO pins and USB on-the-go. It’s able to be programmed in a variety of languages, including Python, Javascript, Microsoft Block Editor, Microsoft Touch Develop and C++.
Behind the scenes, all of these languages use the same core C++ library, published by Lancaster University. This library provides a simplified means to interact with the hardware.
The source code for the C++ library, MicroPython runtime and editor and Touch Develop are available at https://www.microbit.co.uk/open_source.
How to get started with the Microbit depends, in my opinion, on your level of experience:
We opted for the second approach, as we only had 3 days to produce a result. It’s also essential that kids and teachers could understand the code we were writing.
“MicroPython is a lean and efficient implementation of the Python 3 programming language that includes a small subset of the Python standard library” – MicroPython Website
MicroPython is one of the languages available to program the Microbit. In my opinion, it exists as a middle ground between Javascript/Touch develop and C++. It’s useful for programs a few hundred lines in length, but struggles with anything larger.
Advantages:
Disadvantages:
There’s two main ways of getting started with MicroPython:
The online editor is provided by the BBC. It provides the ability to write, edit and save code online and compile it for the Microbit. Uploading the code is as simple as clicking “Download” and copying the file to the Microbit. No installation of any software is needed, the editor runs in any modern browser.
While this editor is easy to use and fast to get started with, it has some downsides. To save scripts for later, you need to make an account and sign in. The editor also requires you to have a constant internet connection.
Another downside is, as of the date this was posted, it doesn’t support the Microbit ‘radio’ library, which allows Microbits to communicate with each other.
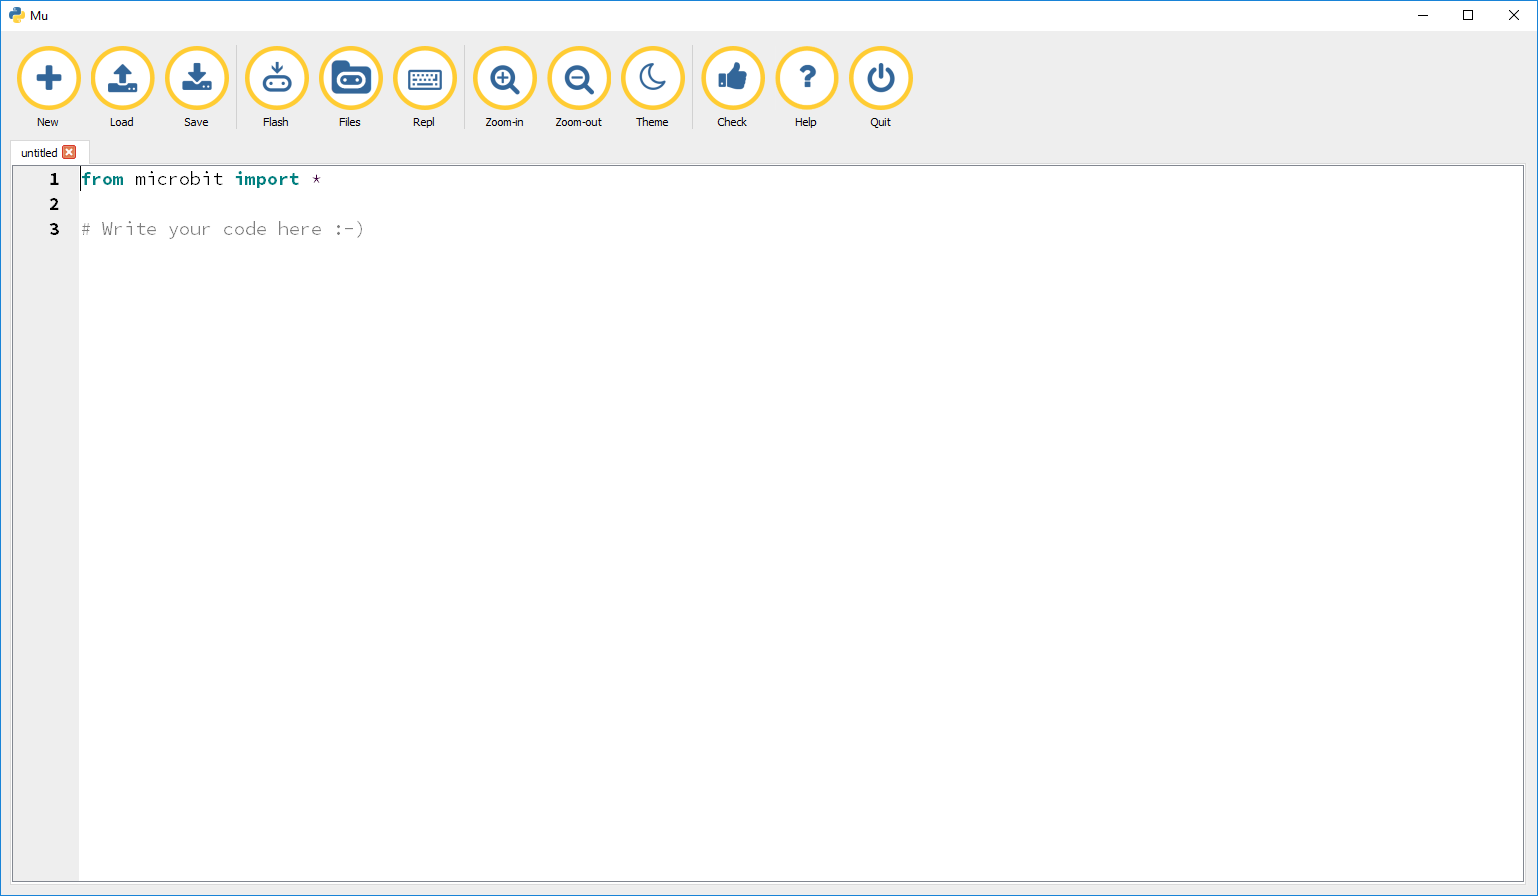
Mu is an offline, open source editor made by Nicholas Tollervey. You can write, edit and save code with it similarly to the online editor. However, files are saved locally, giving more flexibility about when you work and how you store the scripts.
The Mu editor also has several other features the online editor does not:
The downside is that the Mu editor needs downloading and running, something that may not be easy on many school systems. On Windows, the Mbed serial driver is also needed for file browsing and REPL functionality.
Unless you’re just having a quick play, I recommend Mu over the online editor. The extra functionality (especially REPL) is invaluable, as is the ability for more experienced developers to version control their scripts.
As for writing your first script… there’s plenty of tutorials on Python, and the syntax here is identical. Access to the Microbit’s hardware is provided by the Microbit library, with documentation available here.
When a MicroPython for Microbit script grows to a certain size, MemoryErrors start appearing. I’m not sure if the size is file size, or number of function/variable definitions. The error looks something like this:
MemoryError: memory allocation failed, allocating 1584 bytes
If this occurs, the simplest solution is to remove unused lines of code. Shortening variable and function names is an alternative solutions. Using long strings as comments exaggerates the issue, as they aren’t optimised out by the MicroPython runtime. This results in them using annoyingly large amounts of memory.
Another option is to try the online MicroPython editor. When compiled on there, I didn’t get MemoryError issues. I’m not certain why this is, but it seems to work!
Posted in Community, Open Source, Outreach, Programming.
rev="post-1538" 1 comment
– September 2, 2016
Front end testing of web projects is a useful part of a testing strategy allowing you to test how the full stack works together. Automating this process has significant advantages over manual testing in terms of speed and reliability of testing and when included as part of a CI environment is a real asset for your testing strategy.
While .net based projects will often use Microsoft tools to implement continuous integration of automated front end tests, the open source world also provides a set of (free) tools to do this work.
Getting open source tools to work together is not always as easy as the Microsoft route. This article discusses the tips and tricks we learned when getting Selenium, Jenkins, ASP.NET MVC and SQL Server to integrate and provides a sample solution with web site and tests project to show how these tips might be implemented.
Example web and tests projects, plus scripts used in our Jenkins setup can be downloaded from GitHub here.
The technologies discussed in this article are as follows:
The example website project is a simple MVC 5 site that allows you to list, create, edit, view and delete basic details about countries stored in a SQL Server database. The website uses standard .net forms authentication, Entity Framework to handle data connections and code first migrations to deploy the database.
Placing configuration information such as connection strings in a separate file is useful as it allows different settings on the Continuous Integration (Jenkins) machine. In our case we used the config source attribute on the connections strings element and provided a separate DB.config file – this allows the connection string to be easily changed based on the environment and means that connection strings can be easily excluded from source control.
<connectionStrings configSource="DB.config" />
If taking this approach it is important to remember to specify that the included config file(s) should be copied to the output directory.
Visual Studio -> Solution Explorer -> Right click file -> Properties -> Copy to Output Directory -> Copy Always
The LocalDB database does not allow remote connections and so is fine when working in a development environment but does not work well when the website is run from full IIS (which is used for hosting when running integrations tests).
The example tests project (SeleniumDemo.IntegrationTests) is generated from the standard UnitTestProject template. We then add the following nuget packages to enable Selenium testing:
Install-package Selenium.Support
Install-package Selenium.WebDriver
Install-package Selenium.WebDriver.ChromeDriver
We also use the FluentAssertions nuget package to improve the readability of our tests and add EntityFramework to the tests project:
Install-package FluentAssertions
Install-package EntityFramework
The tests project has the following structure:
SeleniumDemo.IntegrationTests
It is critical that the database is in a consistent, known state so that you can assert the existence of expected data on the page. To this end create a set of classes that handle generating known data.
In the example test project the KnownData folder contains classes for generating known account information (AccountDataGenerator) and known Countries information (CountriesDataGenerator). Data generating methods on these classes are then called before each login is attempted (see LoginPageBase.PerformLogin) and before each test is run (see CountriesSpecification.TestInitialize). Note: These classes should also clear any data generated as part of the tests. It makes debugging easier if you make calls to clean up data BEFORE tests are run, rather than after they are run as this allows you to manually check the state of the database after a failed test.
The Page Object pattern separates the operations for reading/interacting with the page being tested from the tests themselves. This makes the tests more readable, less brittle if the UI markup changes and allows you to move from page to page within your tests. This and a number of other general Selenium best practices are available in this informative article.
The example test project shows an implementation of this pattern. The Countries/PageObjects folder contains a class to expose the data and operations required by the tests on that page. These objects inherit from a standard base class that provides a number of methods to simplify these operations. Where possible these operations return the current page object to allow for a clearer, fluent interface. The tests in CountriesSpecification can then make simple, readable calls on the page objects.
In a system where a login is required, the login page object can be used as a mechanism for accessing other page objects (see example code in CountriesSpecification.cs). This ensures that the user is always logged in before trying to access a page that requires login.
In the example test project the CountriesSpecification class inherits from an IntegrationSpecificationBase class which initializes a LoginPage within the TestInitialize method. The tests can then make calls on the LoginPage to access any page object within the application.
The actual login is performed in the LoginPageBase.PerformLogin method. This is called each time a page object is requested and checks whether the user is logged in, ensures a suitable account exists in the database, then performs the actions on the webpage to log the user in.
The page objects rely on css, xpath or other selectors to identify DOM elements within the page under test. An easy way of getting a starting point for selectors is to use Chrome developer tools.
Load the page in Chrome -> F12 -> Find the element within the Elements tab -> Right click -> Copy Selector or XPath
It is best to use the output of these as a starting point as they can be verbose and brittle if you change your markup.
Use CSS selectors are preferable to XPath – here is a useful game that provides training on the subtleties of CSS selections.
We experimented with using IIS Express or Casini to host the website while running the automated tests, however both of these proved hard to configure appropriately and unreliable. Eventually we turned to installing IIS on our Windows development machines and this proved to be more successful. A couple of points that relate to this:
Some selectors may be complex and brittle (i.e. when the markup changes the selector no longer applies). It is OK to add ids or classes to your HTML markup to make Selenium selection easier.
URLs can be hard to manage as site structure and environments change. Rather than hard code URLs within tests provide a class that manages URLs and make this available to your test classes.
In the example test project the URLBuilder class provides a mechanism for obtaining URLs. It gets the base URL and port of the project under test from a config file, and is passed around the test project wherever it is required e.g. Login/CountriesLoginPage.cs
At a high level the key steps we include in our Jenkins project are as follows:
The scripts used in the example project are available in the CIBuildResourceFolder.
The Jenkinks CI will need the following elements installed:
By far the most important thing we learned about working with Jenkins is that it is relatively slow and can be hard to work with. This is because Jenkins is essentially a workflow and each step needs to complete before the next step must be run. This makes the debug/fix/test cycle slow and cumbersome. The consequence of this is:
When you work with handwritten scripts you can easily call them from the command line, tweak them, comment out sections etc. This massively increases the speed of getting each step to work correctly as you don’t need to wait for the source control pull to complete etc. before you check that some post build action has completed. Because many tweaks may be required to get an entire build process to work this approach can save days of frustration.
As with the development phase it is easier to use a full IIS instance on the Jenkins box to host the website to be tested than use IIS Express. The website will need to be setup and tested.
Nuget packages are now an essential part of .net. To ensure that all packages are downloaded when required on the Jenkins CI Server enable Nuget Package Restore from Solution Explorer.
Visual Studio -> Solution Explorer -> Right click Solution -> Enable Package Restore
Strategies for deploying the database will vary based on your data layer, however if using code first migrations you can use the migrate.exe file to perform the update-database action that would usually be called in Visual Studio Package Manager Console. Migrate.exe is included when Entity Framework is added as a Nuget package and can be found in the following folder:
Solution/packages/EntityFrameworkxxx/tools
Migrate.exe needs to be copied into the bin folder of the assembly that contains your migrations. See this article for more details.
Once Jenkins, IIS and SQL Server Express are installed on the Jenkins server create a website within IIS for the project to be tested.
Next, create a script that will prepare, build and deploy the website and database each time the Jenkins job is run. The example code includes the folder CIBuildResources which would be included in the Jenkins workspace folder. This folder contains the script setup_and_build.ps1 – this performs the following steps:
Once each step is tested and you have confirmed that the website can be server by IIS this script can then be included in the Jenkins project. Below is a screenshot of the Jenkins configuration for the example project to show how the steps combine.
The Jenkins configuration for the sample project.
Posted in Programming, testing.
rev="post-1369" No comments
– August 30, 2016
Our tale begins a month and a half ago, in a lab at the University of Southampton….
I was at the beginning of my internship, and we had decided one of the key jobs was fleshing out our data. The Open Data Service previously gathered data using pen and whiteboard. The issue with these archaic tools is time. Not just the time spent gathering data, but processing it all by hand at the other end.
As such, I set out on journey. A journey to create one tool that would facilitate the easy gathering of data. It’s still far from complete, but here’s what it does so far.
Overview
DISCLAIMER: None of this tool is considered “stable” at this point in time. Data formats can and will change, use at your own risk!
The aims of the tool are:
The result is a responsive website, written in PHP. PHP was chosen as it’s trivially integrated into the Open Data service. – https://github.com/Spoffy/OpenGather
User Interface
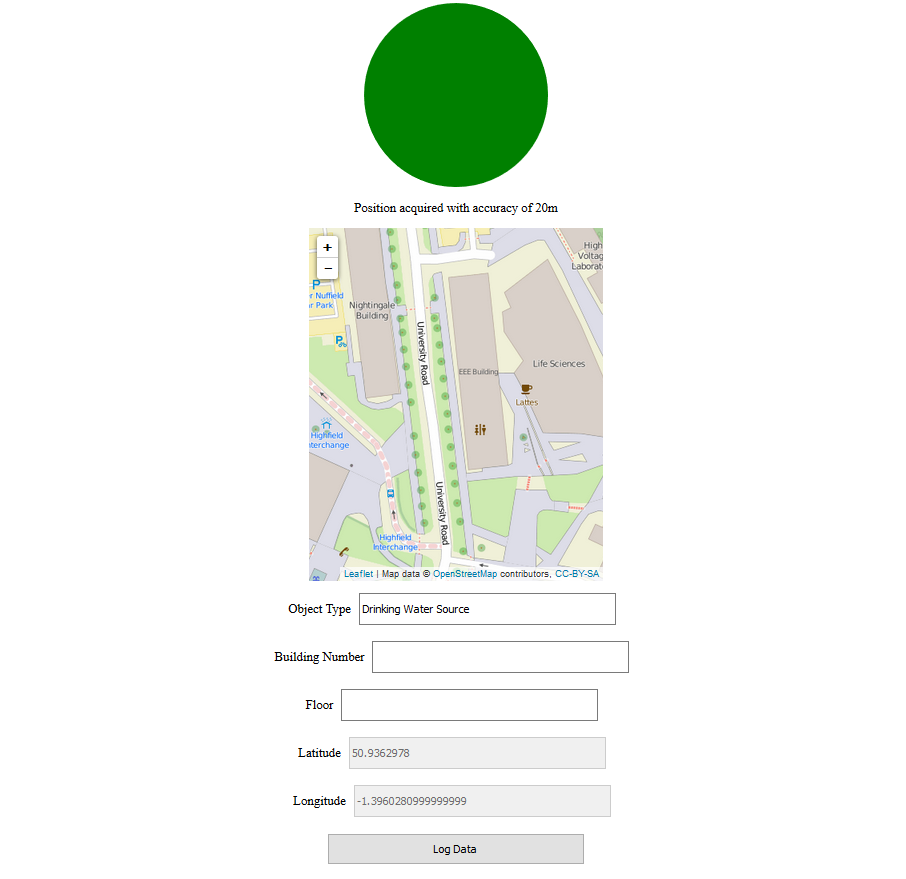
The current interface is extremely simple, but it gets the job done. It shows a set of object types (schemas) people can submit. Changing the schema changes the form fields shown. These can then be filled in and submitted. Any required fields that weren’t filled in are highlighted in red.
The tool currently supports text fields, dropdown fields and geolocation fields. For geolocation fields, the initial values of longitude and latitude use the phone’s GPS. It’s possible to click on the map to select a more precise location. This is especially useful when recording the location-sensitive objects such as doors.
The Database
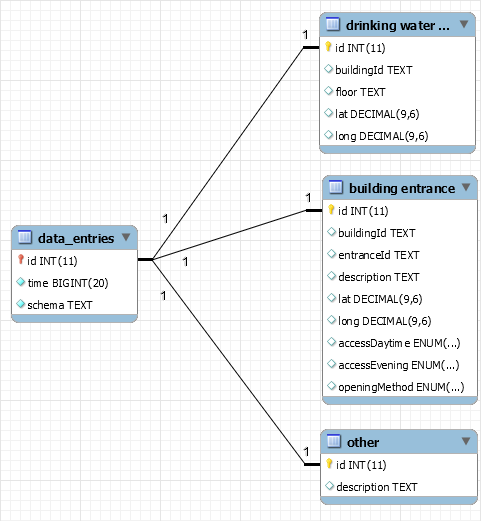
A small subset of the tables.
The tool uses MySQL as its default backend. The details are configurable in config.php. There’s a single central table that records each data item entered. It stores an id, the time and the schema id.
Each schema has its own table of details. Each entry’s id acts a foreign key, relating an entry to the details about it in the schema’s table.
Exporting Data
Currently, the data is exportable as JSON. This format allows several schemas to exist together seamlessly. JSON is also human editable, making it easy to correct long-term data. The tool makes the export publically available at http://yourwebsite/path/to/tool/dumpjson.php. There’s no issue with making data public, as it’s designed to gather OpenData.
The data is also available through the MySQL instance. This method of access isn’t recommended.
The Schema Generator
Personally, I think this is the coolest part of the system. It allows you to quickly specify a schema using PHP. This schema is then transformed into HTML for the web forms and SQL for the database. The web interface updates the schema list when the page loads. Dynamically loading these schemas allows submissions to go straight to the database.
The upshot is that defining new schema is incredibly easy. There’s no need to mess around with HTML or SQL. Just a few PHP objects gets the job done!
The following is a sample schema I use to gather data from around the University:
//Format:
//    new ObjectSchema($name, $fieldsArray);
//    new TextField($name, $id, $required);
//    new DropdownField($name, $id, $optionsArray, $required=true);

$schemas = array(
    new ObjectSchema("Building Entrance", array(
        new TextField("Building Number", "buildingId", true),
        new TextField("Entrance Label", "entranceId", false),
        new TextField("Description", "description", true),
        new GeoField("Latitude", "lat", true),
        new GeoField("Longitude", "long", true),
        new DropdownField("Access Method Daytime", "accessDaytime", $accessOptions),
        new DropdownField("Access Method Evening", "accessEvening", $accessOptions),
        new DropdownField("Opening Method", "openingMethod", $openingOptions)
    )),

    new ObjectSchema("Drinking Water Source", array(
        new TextField("Building Number", "buildingId", true),
        new TextField("Floor", "floor", true),
        new GeoField("Latitude", "lat", true),
        new GeoField("Longitude", "long", true)
    ))
);
In conclusion….
The tool is still very much in the early stages of development. Feel free to use it, but be wary that things may break between versions! If you’re feeling particularly adventurous, merge requests are more than welcome…
Improvements currently on the roadmap include:
The source code is available at https://github.com/Spoffy/OpenGather
(Edit) Next week Eventually, I’ll be talking about taming QGIS, building tilesets and designing GeoJSON maps!
Posted in Uncategorized.
rev="post-1529" 2 comments
– August 22, 2016
Skills Demonstrated
– User Consultation
– Specification Acquisition
– Adding Functionality to Legacy Code
This was another successful week working on choices. Just like the previous six weeks. Due to my mangers spontaneous expedition to Iceland, Docpot was put on hold. I’ve been to Iceland before, didn’t take me a whole week to get my groceries though…(Sorry).
The medical department uses a convoluted method to allocate students to their courses. This requires a separate allocation algorithm due to the uniqueness of their demands. Last year they split the students into three cohorts depending on their background. Some students were able to pick a language in both slots; some could not as one slot was pre-allocated. This needs changing now. It turns out that choices has finally forced me to make an appointment in the hospital. Meetings are much more productive when all parties are in the same room, even if that room is in a dark corner of a large city hospital. The medical department was a pleasure to work with. It’s refreshing when an agreed solution doesn’t need a complete reworking of existing code.
Kev and I split the work between ourselves. The endgame was to ask questions about the language options so students were aware of the requirements. There were three difficulties of a language: beginner, intermediate and advanced. Each required varied qualifications. We needed to implement questions which are only asked when a student pick specific options. If the student does not pick the option, the answer should be set to a default false value. Kev worked on making actions to add choosers to groups depending on their options. I made the changes to the add and edit questions pages to allow a admin to add this functionality to their form. Using what I learnt last week, I refactored the questions controller so it was easier to work with. I cannot stress the usefulness of testing enough!
We got a working demo working by Friday. Kev was showcasing it to the medical department this morning. There are a few minor bugs to fix but they seemed happy with our progress.
I am now over half way through my internship. Choices starting to look healthier now. I know I say every week but I am looking forward to when i can move on from choices. This week TIDT are doing WAISFest, which is a hackathon hosted by the university. It should give me a good enough reason to escape choices. We shall see…
Posted in Uncategorized.
rev="post-1525" No comments
– August 22, 2016
Skills Demonstrated
– Integration Testing
– Refactoring Legacy Code
So week 5 was the tail end of front-end fortnight, what is that you ask? Well I can tell you in layman’s terms as I was the only one in the whole team who had no involvement with it. Our team had two weeks to figure out which front-end framework they would use for the foreseeable future. That left me pretty much to my own devices for the duration. That meant choices for me – there is always something to fix in choices.
The more astute of my readers will have noticed that this blog post covers two weeks. These few weeks have left my blogging ability rather diminished. But I digress.
It is now where I would like to link to you my managers recent blog post “Zen and the Art of Legacy Camp Site Cleaning”. I paraphrase: “Bolting unit tests onto legacy code is pretty much impossible. Untested legacy code which has been chugging along without issue should not be rewritten. The trick is to leave the campsite cleaner than you found it”. There were two incomprehensible behemoth functions in the options controller totalling about 400 lines. Much like choices, 70% of the universe consists of dark energy. No physicist can explain what dark energy is, or how it got there; only what it does. This is where integration tests come in handy. Unlike in unit testing, the controller communicates with fake databases called fixtures. This allowed me to give this pile of code a data set and then examine how it was digested at the other end. I assumed the add and edit functions worked before I touched them and proceeded to make many integration tests using this method. It was important that I had good code coverage in the tests before starting the cleaning process. Good testing allowed for quick refactoring thanks to immediate feedback.
Since pushing choices to live, we’ve had even more requests from users. And so it goes on. A user found a bug where the ‘all pages’ button on the paginator was dysfunctional. The code for the all button was commented out, it appeared as though somebody couldn’t get it to work but then forgot to remove the button from the view. The fix was actually simple. They tried setting the options per page limit to 1000 to make the all button work. This would have worked but there is a sneaky cake setting called ‘max-limit’ which is set to 100 by default, this overrode the 1000 limit.
There are few more things which I fixed and implemented on choices this week. But this blog post is already getting rather long for my liking, and most likely yours so this is it for now.
Posted in Uncategorized.
rev="post-1522" No comments
– August 15, 2016


This work is licensed under a Creative Commons Attribution 2.0 UK: England & Wales License.