Skip to content

Categories:

DepositMO – enabling the user-repository conversation

Barbara Claussen, Modern Monoliths migrating, by Northern SparkAs the DepositMO project concludes, lead developer Dave Tarrant summarises his thoughts on the impact and effect of the project’s technical developments.

DepositMO has contributed to reducing the distance between users and content held in digital repositories. In a world where people are ‘always connected’, the Internet is now being used to both store data as well as transfer it. Content stored ‘online’ can be accessed from any device, such as smartphones, and from desktop applications. ‘Disks’ are disappearing in favour of constantly connected clouds of data. Although the physical distance to the data bits increases, for the user, because their content is available on any ‘connected’ device, the distance to their content is simply that to the nearest connected device.

The repository is one item in this connected cloud and must provide the same types of services. The SWORDv2 and DepositMO extensions replicate much of the functionality of the proprietary web interfaces of repository systems and allow control to be decoupled from the content storage. This decoupling is the key enabler to reducing the distance between content and users.

During the course of the project, two platforms – EPrints and DSpace – were enabled with SWORDv2 and DepositMO extensions, and two clients developed (Watch Folder and the Word Add-in). The Watch Folder client was developed as a result of comments about services not reflecting the usability of Dropbox “Drag Drop Share”. Watch Folder was developed as a demonstration that this type of client could be implemented on top of the SWORDv2 and DepositMO protocols. The initial feedback was positive, but it is not DropBox, and the client still needs some polishing. The protocol is in place, however, and would support a more fully-fledged client.

Since the implementation on EPrints, two developments which utilise both protocols have been undertaken for customers by EPrints Services, a repository services provider: one to harvest tweets into a repository, and the other to automatically manage internal and external repositories of the same items. Significantly, both took less than a week to develop (combined!), demonstrating the understandability of not only the specification documents but also the implementations against the repository platform.

DepositMO set out to enable a conversation between a user and a repository. Unlike generic data storage, a repository is able to provide specific services to a user. Through creating a conversation with the repository it is envisaged that an environment can be created in which the repository is providing added value to the user. Within the project this conversation allows distributed item curation and continued editing. Essentially all this boils down to making users’ lives easier and making these services appeal to new users. Why click 20 buttons and fill in three forms when you can just click one button?

Posted in Uncategorized.

Tagged with , , .


User testing results 4: what users said

We are about to complete the results of the user tests of the novel and original repository deposit tools developed in the DepositMO project.

Based on the tests we have a number of ways to analyse the results. Previously we considered what the timings and task completion tell us about the usability of the deposit tools, and what users did, based on the observer notes and an assessment of the repository records they created. Here we discover what they thought of the tools they were testing, prompted by a series of questions in the user’s test documentation and placed to be answered immediately at the conclusion of the practical part of the test.

We present just the summary results and selected extracts from this user feedback, so we do not have another over-extended post. If you wish to see the unexpurgated comments, here is the original report of the full test results (pdf).

Summary results

1 Would these tools encourage you to deposit more of your own content in a repository?

Yes (8) No (5)

2 Would these tools encourage you to deposit types of content that you have not previously deposited in a repository? Which type?

Yes 5 (inc. images, multiple presentations/teaching resources, computing files) No (6) ? (2)

3 Which of the two new deposit tools (in Word, and in the file manager) used here are you likely to use if it was generally available?

Word (7), File manager (1), both (3), neither (1), repository (1)

6 Or are you more likely to continue to use the standard repository deposit interface?

Yes (6), No (0), ? (4), N/A (3)

These summary results suggest that on balance use of these tools might encourage more deposit, just, most clearly in the case of the Word tool, but it won’t be so easy to wean users off the standard repository deposit interface on the basis of these tools.

Selected extracts from fully transcribed results

Here are some extracts to provide a flavour of the user comments. These are not intended to be fully representative, for which please refer to summary results above and the full test results document.

1 Would these tools encourage you to deposit more of your own content in a repository?

User2 (EdShare) Yes For me the Word tool. The MO (file manager) deposit was initially exciting but the difficulty of differentiating between many files was frustrating as filenames were not carried over. The updating via Word for single files and also the addition of new items via MO leading to either loss or overwriting of previous metadata is v. frustrating.

User 3/1 (Library) The Word deposit seems very simple, provided it’s easy to get the DepositMO add-in. I would like to know if I need to construct my Word docs in a particular way. Image deposit (file manager) seemed complicated and a bit confusing – not sure I’d use this.

User 5/1 (Kultivate) If uploading Word files would definitely use the DepositMO tool. Not sure about other content.

2 Would these tools encourage you to deposit types of content that you have not previously deposited in a repository? Which type?

User 1/1 (EdShare) No. Folder deposit confusing

User 1/2 (EdShare) No. Word integration confusing

User 3/2 (Library) In theory – yes – but possibly only Word as that was easiest!

User 5/2 (Kultivate) I think yes for PDFs (and Word docs) – of course the images still seem to require more work/metadata

3 Which of the two new deposit tools (in Word, and in the file manager) used here are you likely to use if it was generally available?

User 1 (EdShare) File manager. Word version confusing in version control, settings and location of files

User 6/1 (Archaeology) The Word one is nicer and a good idea, but all are confusing

User 7/2 (Archaeology) Word was very useful for text. The file manager was good for images but possibly required a bit more prior knowledge.

4 How would you improve either of the tools?

User 1/2 (EdShare) Make actions of file manager clearer (what is being updated and where)

User 2 (EdShare) More metadata extracted from original file e.g. title from name, creator from owner (if available) and also type (Word added-both showed as HTML files)

User 3/1 (Library) Word – I wouldn’t require user to add/edit URL; Image – I think this needs to be made more user friendly

User 3/2 (Library) Metadata requirement (i.e. having to add title in HTML) in file manager prob off-putting to some.

5 Are there features of the new deposit tools that would deter you from using them for repository deposit?

User 2 (EdShare) Overwriting metadata which had been hand-edited when updating or adding additional files is a real turn-off.

User 3/1 (Library) Image deposit is too complicated. I wouldn’t remember the URL needed for Word deposit

User 3/2 (Library) I have nothing to compare this with, but I did find too many windows open caused a degree of confusion

User 5/1 (Kultivate) With uploading images etc 
 I think the time taken in standard way is about the same, due to adding metadata. I think the ‘watch folders’ idea is brilliant but needs to be developed further.

User 6/2 (Archaeology) The fact that each file’s metadata had to be in its own folder with that file -> hard to deposit large directories of files.

6 Or are you more likely to continue to use the standard repository deposit interface?

User 1/2 (EdShare) Yes. Better/clearer control. Less ambiguous.

User 2 (EdShare) Would like to be able to use the new deposit tools more as the traditional, although v. good for library geeks like me, is long-winded for the normal academic.

User 6/1 (Archaeology) I think yes because it is proven to be efficient

Any other comments?

User 5/2 (Kultivate) Really helpful for documents – I can see that for repository managers and even self-depositors this could be helpful, saving quite a bit of time.

User 6/1 (Archaeology) Good ideas but they are not easy enough to use. They seem slow and frustrating.

Once again, we thank our users for engaging fully with these tests, for the time and effort they gave to participate, for their rigour and objectivity. As we saw earlier in the live audience demonstrators, it’s when you put software tools in front of users that they come to life.

Our test users were: I. Atkins, Joy Caisley, Grant Cox, David Davies, Helena Dmetriou, Harry Gibbs, Nick Graffy, Marie-Therese Gramstadt, Matthew Harrison, Alisa Miller, John O’Hagan, Isobel Stark and Adam Warren.

I must also thank the organisers of the user test teams, who doubled as test observers to report on individual tests. Our observers were: Penny Copeland, Debra Morris and Kate Walker.

This completes the recorded results from the DepositMO user testing. In the remaining posts, as the project ends we will seek to draw some lessons and conclusions from the tests and from the project overall. These will be our interpretations of the results. If you have a view on these results and what they might tell us about the deposit tools developed by the project, or on the prospects and needs for future repository deposit tools, please leave a comment.

Posted in Uncategorized.

Tagged with , , , , , .


User testing results 3: what users did

Based on the tests we have a number of ways to analyse the results. Previously we considered what the timings and task completion tell us about the usability of the deposit tools. Here we get some insights into the times taken to perform the tasks by using the records of what users did, taken from the observer notes and an assessment of the repository records they created.

For completeness, and since it did not seem appropriate to break the post between users, this is necessarily a much longer post than usual on this blog.

User 1

Pair. Experienced repository users, many deposits of a variety of content types over years.

From repository record

Hard to match record with observer notes and intended test chronology. Ended with 5 deposits of doc 1. Took a long time to deposit image 1. Appears to make some false starts with image deposit, did PDF, then returned to image 1 and ended with a collection of 4 images, including all 3 images provided in the sample data for the test and an additional image not provided. Deposited doc 2 (no metadata) and updated by adding a new item (with metadata).

Extracts from observer record

Deposit item 1 (doc 1) Clicked submit x2 so resulted in 2 deposits.  “Would have expected an update” – both agreed. It’s like a ‘save’ button – expect new copy of the doc. Item type – should be doc not unspecified

Deposit item 2 (image 1) Didn’t work first time. Then did work when refreshed screen for manage items = Revision 11 though! But there doesn’t seem to be anything actually there? Ghost image and also actual file. Went back 3rd time for item 2 -> added another image as the revision of the first Separate folder for each item? How would it tell which version? Well that worked = Rev 14 did what was expected

PDF Subjects -> LC/Dewey – choice? Tried to search for several subjects.

Image 2 Seems odd that would need to create a separate folder for each item. If I have to create a new folder for each item I am never going to use this!! Cut item from original folder. Waited for metadata file. Revised metadata – abbey by night. Resulted in a deposit with 4 files

Doc 2 MS Word error message about the file because it seemed to take the title and corrupt the file. Going back and try again – create new folder. Doc not corrupt at moment. Used short cuts to copy and paste -> my doc which I’ve spent months working on may have been corrupted … Titles seem to be switching around … and the doc seems to be fine when opened up in the repository

Updating doc Error message – forgotten details which had been provided – username and password but no location -> went to item which was locked. Hopelessly lost. No confidence about which document we are working on

Click on’ Submit’ – then this created another copy Characterising and preserving

How does it know which doc I want to update rather than creating a new version?

User 2

Single. Experienced repository user, many deposits of a variety of content types over years in different repositories.

From repository record

Appears to have completed all stages in correct order, and deposited a substantial number of own items including a variety of document and format types, although the collections appear to have become mixed within records, some duplication of items. All repository records can be identified by title, with supplementary metadata added to describe items within records. Looks like an exemplary result.

Extracts from observer record

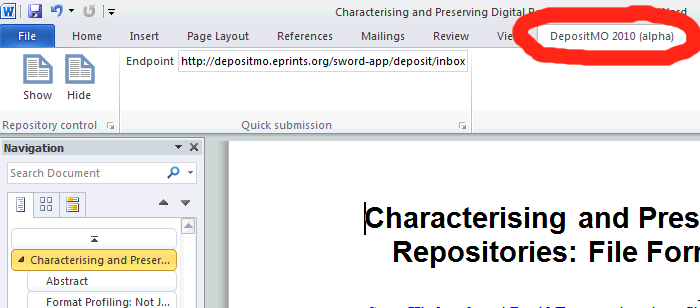
Opening Word user panel. Missed (the Word deposit tab) at first; looked at repository. Needed prompt to ‘show’ the panel.

Image 1 Had closed depositMO folder after first use. Eventually realized it had to be reopened.

Doc 2 Reset user panel correctly. Added more metadata through EPrints deposit interface

Image 2 Named folder (‘Bath’) this time. Again added more metadata through repo. interface.

Update doc ‘lost some of my added metadata’ e.g. item type. Went back to add again

Add image User waited to see if more VIEW, METADATA files were generated. Noted they didn’t. ‘lost metadata again’. Added again through repo. interface

Own content Deposited 2x pdf + ppt via file manager tool. Added metadata via repo. interface. Added Word doc via panel, added metadata. Then copied ALL own content into one folder. Added one extra item to collection which overwrote previous title and added title of new item.

Parting comment: ‘Like Word’. Would like other (Office apps). That would encourage. Don’t like losing metadata.

User 3

Pair. One is an occasional repository user, the other a non-user.

From repository record

We don’t have an end timing for the short break in the process prior to update doc, hence the span of time for this task and for the total deposit time. A lengthy time for first deposits of both doc and image. No image deposits can be found in the repository workspace for this user. On inspection, these deposits can be traced to the workspace of User 1, probably due to an issue with the user configuration file in the ‘watch folder’, which directs content to the user’s login space in the repository. Image 2 was at first added to same folder as image 1, but then deposited separately in own folder. The docs and pdf do not use the config direction and appear correctly in this user’s repository workspace, with a duplicate entry for doc 1, all identified with metadata. No own content.

Extracts from observer record

Opening CONGIG file. Doesn’t automatically open – users had to open this in Notepad

Opening Word user panel. No label to say it is ‘user panel’. Author panel had a label, which caused some confusion.

Resetting repository location in Word user panel. My testers missed out this step, so the process didn’t work.  They received an error message ‘couldn’t understand response from server endpoint’ and realized their mistake.

Setting login in Word user panel. Password defaults to admin – confusing.  No confirmation when new password is entered to say that the username and password works.

Doc 1. Two identical records were added to DepositMO. . Users updated one, so there may be two on the screenshot with different times. Some confusion over ‘item type’ and what this meant. The testers had a discussion at this point about metadata, and how the repository found the title, as it wasn’t the title of the document.

Image 1. Testers not entirely sure where the depositMO folder was. Users said they didn’t understand what the script was meant to do.  They misunderstood and thought they had to copy the image into the repository itself. On adding metadata to the image, testers were disappointed with this – they didn’t understand exactly what they were doing.  They expressed doubts that academics would do this (XML text edit). Image 1 didn’t appear in the repository, although clicking on the View_item.html took them through to the appropriate record.  It appears that drag and drop was adding the record to the ‘user1’ account, even though they had updated the Config file correctly.

Doc 2 Deposited using the Word App

Image 2 Deposited using the Drag & Drop method. The testers didn’t understand the point of the different folders. Testers didn’t set up different content folders at first, but realized their mistake and made a second attempt.

Testers had remembered most steps at this point. Testers commented that there are too many steps, it is not straightforward, and it is not that different to the existing eprints interface in that regard.

Add image. Testers didn’t have time for this, but had inadvertently done this already.

Testers queried again how much more metadata you would have to add if using the Word app and the Drag and Drop options.

User 4

Pair. Both are non-users of repositories.

From repository record

As with user 3, which was simultaneous with this user test, image 1 and the added image appear in the repository workspace of the user 2 account, although this was avoided for deposit of image 2 by using the conventional EPrints deposit interface. Image 3 was added to image 1 and so also ended in user 2 account. As with user 3, this may partly account for the time taken to deposit image 1. All repository entries have at least basic metadata description and are identifiable in the list of records, including two items of own content but excepting the drag-and-drop items that ended in the user 2 account.

Extracts from observer record

Doc 1 “Show’ panel not obvious – “need explanation” Prompted

Image 1 Just deposited item, not in list of records but can view item

Doc 2 Word user panel – need to update again “find it hard to remember what have done”

Image 2 Used EPrints deposit interface

Update doc Went to repository ‘Edit item’ button. Prompted – back to Word panel. “Check if it worked”

Own content 1 Word doc – deposited, then added more metadata through EPrints deposit interface

Own content 2 pdf – using EPrints deposit

User 5

Pair. Test users only to date, but expect to be more regular repository users in future.

From repository record

An unspecified item appeared in this user account just prior to deposit of doc 1.

Image 2 is described, but image 1 with added image 3 are not.

Unusually for these tests the pdf is fully and correctly described, this taking slightly longer on this task than other users.

A large amount of own content was added using the file manager tool. These were packaged content – a ‘web site’ and zipped archive – and the aim was to see how the tool extracted and presented the contents. No metadata was added.

Extracts from observer record

Doc 1 Two unspecified objects in repo at this point + deposited doc. Picked up metadata from doc inc abstract: “Good”. Does doc need to be “tagged” for this to happen? “Good to have item type.” “Could improve description.” Started to add metadata via EPrints interface – “off piste”.

Image 1 Copied doc by mistake. Deleted – but it returned. Then successfully  copied intended image. “Quite fun.” “Could be more user-friendly – populate metadata rather than XML.”

PDF Couldn’t copy-paste abstract. Worked 3rd time. Added metadata carefully

Doc 2 Want Word deposit set to default URL. “Like the way it flags up” missing metadata. Checked what’s there/not there: “still quite a few required fields not populated”

Image 2 Chose to use EPrints interface – “like to be able to add keywords, contextualise, but don’t know creator, etc.

Update doc Users checked this replacement but couldn’t identify which document to open at first

Add image This instruction assumes they would have used the file deposit tool to add image 2 – they hadn’t (see above). Added image to existing folder. Then didn’t know which item it had been added to – at first.

Own content “Quite like to test uploading a Web site.” The file tool grabbed lots of pdf files. Zip file: “Maybe it doesn’t like zip files”

User 6

Pair. Mixed experience pair: one had not previously used a repository; the other has used a media and image repository rather than an open access institutional repository such as EPrints.

From repository record

We do not have definitive observer time checks for start of deposit, hence the span of time for doc 1.

Doc 1 is listed with a title, but there is no other metadata in the record and full-text is not available.

Image 2 was deposited twice, accounting for the extended deposit time for this item. Added to same folder as image 1, then deposited as separate item as required. Title metadata added

PDF added with minimal metadata.

Own content included a large video (700 MB) and further attempts to deposit image 1 (an archaeology picture by a colleague)

Extracts from observer record

File manager deposit tool setup: user A didn’t understand the config file set up although user B went straight to it and just did it with no comments

Doc 1 Options did not seem straightforward, there was clicking to find things and then going back. “We can’t follow simple instructions” – they are too impatient they think. I think they were looking for a way to upload a new description but couldn’t find one. There is confusion around the terminology of “submit” and “deposit”. Tried to submit it twice because of confusion but recognised that when they got a warning or error message.

Image 1 Confusion about folders for deposit but reference back to the instructions helped. Some uncertainty about what to put in the title

Doc 2 Error message for address to deposit – some confusion until the right place found. Some confusion from two people working together not knowing what button the other has pressed. Some problems when didn’t submit properly. They tried to submit again. Some confusion about how much information you HAD to put in before it would allow you to submit. What does “user work area” mean?

Image 2 Managed to submit things and then made the new folders which was considered to be confusing. Metadata file appears to have been rewritten – it did not contain the information they had submitted. Different file structure for this part of the test. It takes a while for the metadata file to be written. The metadata options generated some uncertainty with data deleted or overwritten and so the required things to enter could not be found. They lost the object that they had put in by putting it in the same folder as something else. They put it in again. Considered to be very fiddly, and creating a new folder for every file at this speed is too time consuming with the delay in the creation of the metadata file. AND then another object appeared in the folder – seemed to be a serious time lag for this to happen i.e. reentering stuff that is there but hasn’t appeared yet
 “This is evil”.

Update doc Success first time.

Add image Worry and concern that this would break the system again! But some uncertainty about how this as a system would work, i.e. illogical? Problem – they think that the program keeps rewriting their metadata. The program is confused about the files and the metadata. Trying to sort it out took some time – Had to use the details to work out what was happening.  Altered through the web browser (EPrints interface) which a takes a long time to update the metadata file itself.

Own content Using the EPrints interface as it was considered to be the easiest way to do it. Video took a long time to upload but no problems.

User 7

Pair. Both are regular and experienced users of the Blackboard repository, and have deposited a range of content types.

From repository record

An ‘unspecified’ and unexplained record appears first, as for some other users. The first doc deposit has metadata, but doc 2 unusually has no description, although it is updated correctly. The PDF is deposited with made-up metadata. All texts are deposited into the repository review area. From the summary timings, only the image addition is notably longer than other tasks. Deposit of image 1 appears to be unsuccessful, but it appears with image 2 (not according to instructions), both attempts listed as ‘unspecified’. Then image 2 is joined with image 3 (as instructed) but with the title ‘Waterwheel’. Finally, own content is a series of 6 images collected, again, under the name ‘Waterwheel’.

Extracts from observer record

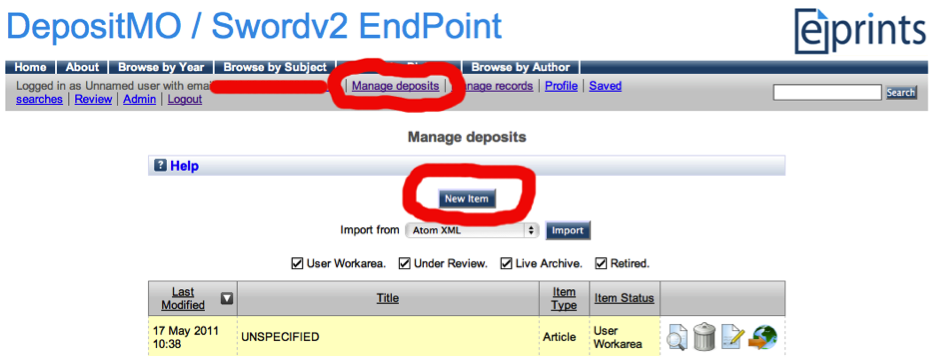
Setup demo repository Clicked ‘New Item’. Added an unspecified object?

Setup file deposit tool, open watch_folder Incomplete

Image 1 Needed to advise opening watch_folder. “What are the unspecifieds that keep popping up?”

PDF Performed deposit without reference to the actual document provided

Image 2 Copied to same folder as image1, then set up new folder. Added metadata via XML page (did not display)

Update doc Opened new copy of doc2 in new Word window. Update didn’t work. Not previously submitted version – opened new? Found path in original eprint, updated successfully. “Hasn’t identified title” Wiped metadata, “really annoying”

Add image “went in straight away”

Own content 6 images copied in one folder. “Worked well”. Opened XML metadata page for folder. Then added metadata via EPrints form.

Found there were two items in repo! Renamed wrong item. Re-copied. Deleted generated metadata.xml. Failed to recreate. Copied again. Added metadata via EPrints form.

The next post will show what users said about the test and tools they used, based on feedback from the test form completed immediately at the conclusion of the test.

Posted in Uncategorized.

Tagged with , , , , , .


User testing results 2: times taken to perform tasks

Based on the tests presented to users we have a number of ways to analyse the results:

  1. Times taken to perform the tasks
  2. What users did, based on the repository record and observer notes
  3. What users said, based on feedback from the test form

Subsequent posts will reveal what users did and said. Here we focus on what the timings and task completion tell us about the usability of the deposit tools.

User tests were performed over a series of dates during June and July 2011. Some tests were simultaneous and co-located. In total 13 users performed the test in 6 pairs and one singly (recall, tests were set up for pairs, to provide the opportunity for reactions to be vocalised between users, and to avoid equipment limitations for the controlled test environment).

Users 1, 2: June 3
Users 3, 4: June 17
User 5: June 20
Users 6, 7: July 5

All users completed the same tasks, guided by the same instruction document. Minor amendments were made to the document between tests to improve and clarify procedure, as pointed out by users, where problems were deemed to be due to the test documentation rather than the tasks and tools under test.

Procedure For reference, this is a quick chronology of the deposit test process outlined in detail in previous posts:

  • Deposit a Word document (using Word tool) Doc 1
  • Deposit an image (using file manager tool) Image 1
  • Deposit a pdf using the standard EPrints repository interface (PDF)
  • Deposit a second Word document (tool chosen by user) Doc 2
  • Deposit a second image (tool chosen by user) Image 2
  • Update the second Word document (Update doc)
  • Add an image to a collection including the second image (Add image)
  • Deposit own content (Own content)

Results

Time taken to perform set tasks

Table 1 shows times grouped by process and tool rather than chronologically.

Table 1. Time taken by users to perform set tasks in deposit test process

User 1 User 2 User 3 User 4 User 5 User 6 User 7
Total test time 73 mins 75 mins ? 84 mins 80 mins 71 mins 64 mins
Deposit time 61 67 44-54 63 56 46-51 47
1st doc 4 3 10 5 7 2-7 3
2nd doc 5 5 2 5 6 3 2
Update doc 7 3 1-10 6 2 3 4
Total doc time 16 11 10-19 16 15 8-13 9
1st image 20 6 12 14 4 5 6
2nd image 5 5 6 3 6 10 3
Add image 4 4 5 7 11
Total image time 25 15 18 21 15 22 20
PDF 8 10 14 13 17 5 8
Own content 10

two videos

30

doc ppt xlsx pdf

10

doc, pdf

8

zip, web site

8

video

8

images

Notes on Table 1

Times were recorded by observers for selected stages in the overall process. The repository timestamps, including the EPrints history for each record, were used to calculate times of individual tasks.

Where a time duration is unknown, or where a time range is given, the observer notes are incomplete.

Where no time is given, the procedure was not completed.

Where the process appears to be continuous, it is assumed that the last recorded deposit time for an item is the start time of the next deposit process, even if the first recorded deposit time for the subsequent item is some minutes later. This assumption is based on the need for users to assess the instruction and decide which actions to take, and that the time taken to do this is an implicit part of the deposit process for each item.

Not all user processes were continuous or followed the order of the instructions. Where this happens timings are likely to be less reliable, based on an assessment of the record and a judgement of how users proceeded. Such instances will be specified.

e.g. User 1: the deposit of images and the PDF appear to be interleaved, so apportionment of the times between images and pdf are approximate.

Deposit time ≠ Total doc + Total image + PDF + Own. Allow ± 1 min for each action.

Deposit time ≠ Total test time. Additional time is taken to read the documentation for the procedure, and to complete questions before and after the deposit process.

Repository clock set 1h slow. (This is only relevant when comparing observer timings with repository record.)

General observations on times

The total time taken to complete image deposits was in all cases longer than the time taken to deposit and update Word docs. There was more variability in times of image 1 deposit, but less so for subsequent image deposits when the procedure was more familiar. Some image deposit cases were not completed, but all doc deposits were completed.

In the next post we will look at what users did, based on the repository record and observer notes.

Posted in Uncategorized.

Tagged with , , , , , .


User testing results 1: user profiles

We are about to learn the results of the user tests of the novel and original repository deposit tools developed in the DepositMO project.

To understand the context of the test results we need to know something about the users who performed the tests. All users, apart from two, are based at the University of Southampton, the home of the DepositMO project. We are grateful to them all for their participation, and will acknowledge them individually at the conclusion of these results.

The test instruction document included two questionnaire sections:

  1. Before any deposit actions, to find out the prior experience of testers in using repositories.
  2. After deposit tests, to discover their reactions to the tools used in the test.

This post summarises the findings from part 1.

  1. Have you deposited content in an institutional repository? Yes 9 No 4
  2. In which repository do you deposit most? EdShare (3 users), EPrints (3), Blackboard (2), MediaBin (1), none (4)
  3. Do you deposit content regularly? Approximately how many items have you deposited in this repository? Over how long a period have you been depositing? See Table 1
  4. What type of data have you deposited? Presentation slides (4 users), research papers (PDF) (3), images (3), video (3), docs (2), theses (2), audio (1), research data (1), spreadsheets (1), handouts (1), reports (1), essays (2), computer project (1), database (1).

Table 1. Brief history of repository deposits by our test users

Regular deposit Number of deposits Time period
No 70 2 years
No 30(ish) 2 years
No Bursts 1-4 years
No 2 Ad hoc
? 100s (images) 3 months
? 4 10 months
? 15 1 year

This presents a picture of a mix of experienced and new repository users, a reasonable profile for this test since the tools are aimed at both types of users. Among the experienced users, none claim to deposit on a regular basis, but some show many deposits of a wide range of data types over an extended period. In this presentation we will not be seeking to stratify the results between users and non-users.

In the next post we start to learn how these users got on with the tasks set for them in this test of new deposit tools.

Posted in Uncategorized.

Tagged with , , , , , .


User testing: instructions for users 3: depositing content

User testing depends on providing clear instructions to users. This is the third of three posts providing key sections of those instructions, intended to inform readers interested in understanding the results of user tests of the new deposit tools developed in the DepositMO project, and taking a critical view. If you have followed the first two posts presenting the instructions for users, you may have decided already not to download the full instruction document (pdf) as originally presented to the test users, but you can still do so.

In this final extract we learn exactly what users were asked to do for the test, as it is time to start depositing some content. Why is the test structured in this way? At this point it may be worth referring back to the earlier post on the design of the test procedure.

Control ribbon in Word 2010

Figure 2. Revealing the control ribbon in Word 2010 for the deposit application

Time to start depositing some content

By now you have set up the drag-and-drop deposit tool, you have some content, and you are logged in and ready to deposit something in the demo repository.

Support and assistance is not available for this part of the test, except to clarify the instructions given here.

If you are working in a controlled group you may be observed during this process. Both your actions and comments may contribute to the results. Again, we should stress the results from this test are intended to inform about the tools rather than the users, so don’t be shy of commenting. You may make comments to the observers, but during this part of the test they are unable to engage in dialogue. If you are working in a pair your discussion may be helpful in providing recordable evidence for the results.

Deposit item 1

From the sample_data folder open doc1 in Word. Now we have opened Word we can use the deposit tool that has been added to Word. First we will check the setup of the tool.

  • Open the DepositMO (alpha) tab and ‘show’ the user panel (Figure 2)
  • In the panel ensure that Repository location is set to http://depositmo.eprints.org/id/contents
  • Set the panel to your correct login details – same username and password  as your repository login.

Using the panel, ‘Submit’ the document to the repository. Go to your Web browser with the demo repository open, and click on (or reload) Manage deposits (Figure 1) to see the content you have just deposited. How is it described? Could you improve the description?

Deposit item 2

This time we will use the file manager tool, which we set up earlier. Find image1 in your sample_data folder. Copy this file using the short-cut keys for your machine. Return to your depositMO folder on the desktop, and add a new content folder (name it as you wish). Using the short-cut keys, paste image1 into the new content folder. The tool should now automatically deposit the copied image into the repository.

Open the new content folder and you should see two new files appear: VIEW_ITEM.html and (after another 10s or so) METADATA.xml. Clicking on VIEW_ITEM.html will take you to the repository, showing the record for the item you just deposited. Open the METADATA file by right-clicking and selecting a text editor (e.g. Notepad) to show the editable metadata extracted from the file for the repository. Add a title by including this line (e.g. just above <author>):
<title>Archaeology image</title>
Then ‘Save’ the file.

Again, click on Manage deposits in the demo repository to see your current list of deposited items. You should see an item listed with the title you just added.

Deposit item 3

We want you to deposit pdf1 using the standard repository deposit interface. From your Manage deposits screen in the demo repository, click on the New Item button (Figure 1). Deposit item 3 in the usual way using the EPrints interface.

Hint. After clicking the Choose File button browse to the sample_data folder via Recent Places. When adding metadata using the deposit form you only need fill in the required fields to complete the deposit.

Deposit items 4, 5

You have used both new deposit tools and the conventional repository deposit interface. Now deposit the next two items (doc2, image2) in your sample_data folder, using the deposit tool you think is most appropriate.

Hint. If you copy to the depositMO folder you may wish to set up a new content folder for each item deposited.

Short pause. At this point please ask the observer or test moderator to take a screenshot of the Manage deposits list in the repository window.

Moderator’s note. We need a time check here, before some of the items are updated and the Last Modified time changes. How long did it take to deposit each item up to this point? Timings are a rough-and-ready indicator of the ease and speed of the different deposit processes.

Updating a document

In this case we want to update the content of doc2, which you have already deposited.

Open item 7 (doc3) and copy the paragraph of text. Return to doc2 in Word – unless you closed this it should still be open in a separate window. Paste the copied paragraph where indicated in doc2. ‘Update’ the document in the repository using the appropriate button in the panel. In this way the updated document should replace the original.

Updating an item

This time we want to update an item in the repository by adding another image of Bath (image3) to the item containing image2. Unlike the case above, we are not replacing the original content, and the updated item should display both images.

Hint. You will need to return to the depositMO folder but in this case you do not need to set up a new content folder. Instead add the latest image to the appropriate folder among those you have already set up.

Depositing your own chosen items

Did you bring your own content? Given an open choice, what content do you want to be able to deposit in a repository? As with items 4 and 5, deposit your content using the appropriate tool.

Improving description

Your Manage deposits view of the repository should now contain a reasonably extensive list of contents, but can you tell which is which? Is each item sufficiently described for identification by you, or for discovery by others?

This concludes our extracts from the instruction document presented to test users. In the next posts we will find out how those users fared with the test, as we begin to analyse the results.

Posted in Uncategorized.

Tagged with , , , , , .


User testing: instructions for users 2: test setup

User testing depends on providing clear instructions to users. This is the second of three posts presenting key sections of those instructions, intended to inform readers interested in understanding the results of user tests of the new deposit tools developed in the DepositMO project, and taking a critical view. Alternatively, you can download the full instruction document (pdf) as originally presented to the test users, and skip the instructions-for-users posts.

In these extracts from the instruction document we guide users in how to set up the tools and services available to them for the test, and describe the initial content provided for the tests.

Demo repository screen

Figure 1. Demo repository screen showing Manage deposits view and highlighting New Item button

Initial setup

Support can be provided during this part of the test.

Demo repository

  1. Open a Web browser (e.g. Google Chrome).
  2. Proceed to the demo repository at http://depositmo.eprints.org/
  3. Login to the demo repository using the username and password provided.

This should take you to the Manage deposits screen shown in Figure 1 (if not, click on Manage deposits). You should now have an empty repository ready for your personal use. You may be familiar with the interface if you have used an EPrints repository before.

Word deposit tool

We will run through this process when we open the first document.

Drag-and-Drop file manager deposit tool

  1. Open the depositMO shortcut found on the desktop. This is a file manager, which opens within a depositMO folder and shows a CONFIG file and a ‘watch folder’
  2. Click the watch_folder to open it. This will automatically start a script in a new window. Leave this window without closing it.
  3. Click to open the CONFIG file and check that it shows your username and password for the repository. If not, edit these items directly in the text editor (use e.g. Notepad if prompted) displaying this text and ‘Save’ the updated text. The purpose of this is to direct deposits to your personal workspace in the demo repository.

Test content

For the purposes of the test procedure we are providing a folder of content. Later in the test there will be a chance to work with some of your own content.

If you open this sample_data folder from the desktop you will see it includes:

  1. doc1-cloud  (a short conference paper)
  2. image1-archaeology
  3. pdf1-ecda-confpaper (a short conference abstract/paper)
  4. doc2-profiles (a journal paper)
  5. image2-Bath Abbey
  6. doc3-missing paragraph
  7. image3-Bath River Avon

In addition, we hope you have brought some of your own content that you wish to deposit in the repository.

Posted in Uncategorized.

Tagged with , , , , .


User testing: instructions for users 1: test structure

User testing depends on providing clear instructions to users. This and the next two posts will provide key sections of those instructions, to inform readers interested in understanding the results of user tests of the new deposit tools developed in the DepositMO project, and in taking a critical view. Alternatively, by downloading the full instruction document (pdf) as originally presented to the test users, you can skip the instructions-for-users posts.

Or stay with this post. In the first extracts from the instruction document we outline what users will do, how and where they will work and what they will be provided with in the tests. One of the measures of the test is user responses to questions put to users both before and after the test, about themselves and, lastly, their response to the test. Those questions are listed here.

From the user instruction document …

Structure of the test

The following are the primary facilities you will be provided with for the test, on the desktop of the provided machine:

  • Login to a demonstration (demo) repository server
  • Word deposit tool – a downloadable application to add a deposit service to Word 2010
  • Drag-and-Drop deposit tool – a downloadable script to provide a ‘watch folder’ for your file manager
  • A folder of sample_data ready for deposit in the demo repository.

* For controlled tests the test computer will be pre-populated with these facilities and no downloading is needed.

Your test environment

This test may be performed in one of two environments:

  1. A controlled exercise. You may be asked to work individually or in pairs.
  2. Individual working using the instructions in this document. Telephone or email support may be available by prior arrangement.

In either case please note that any support is only intended for specified setup processes, not for the deposit element of the test. It is important that support does not affect or influence the outcomes of the test.

Please remember, we are testing and evaluating the tools and processes, not you or other users.

Results of the test

The outputs of your work in the tests will be recorded in three ways:

  • Your answers to questions provided in this document
  • The content and metadata in your personal demo repository
  • For observed tests, notes by observers

Where reported, results will be presented anonymously.

Your background

Before we begin we need to know something about your prior experience of depositing content in a repository. This will help qualify our analysis of the results of these tests.

  1. Have you deposited content in an institutional repository?
  2. In which repository do you deposit most?
  3. Do you deposit content regularly? Approximately how many items have you deposited in this repository? Over how long a period have you been depositing?
  4. What type of data have you deposited: research papers, presentation slides, images, video, research data, other?

(For the sections setting out the initial set up, and deposit tasks – sections that preceded the concluding questions in the full test document – see the next two posts.)

Concluding views: your experience of the test

If you have been working in a pair you may each provide an answer to these questions.

  1. Would these tools encourage you to deposit more of your own content in a repository?
  2. Would these tools encourage you to deposit types of content that you have not previously deposited in a repository? Which type?
  3. Which of the two new deposit tools (in Word, and in the file manager) used here are you likely to use if it was generally available?
  4. How would you improve either of the tools?
  5. Are there features of the new deposit tools that would deter you from using them for repository deposit?
  6. Or are you more likely to continue to use the standard repository deposit interface?
  7. Any other comments?

Posted in Uncategorized.

Tagged with , , , , .


User testing: design of the test procedure

We began this current series of posts with a promise to present the results of user tests of the new deposit tools developed in the DepositMO project. Via a convoluted route we are finally ready to present those results.

In this series of posts we have described the target of the user tests: the DepositMO tools for Word (Add-in) and for the file manager (Watch Folder), and the extended SWORD infrastructure, to deposit in-progress works from the desktop to the user’s specified repository. To design and perform the tests, however, we need to be more precise about what is being tested and how. That is what we will map out in this post, covering purpose of the test, materials to be used, target users, and measures and outcomes.

Purpose. With any user test it is vital to be clear what you are, and are not, testing. In this case we are testing the process of repository deposit using two new tools, that is, it is a usability test.

Ultimately, if these tools are to succeed then they will have to be available to general users in ways that enable them to be downloaded and installed by those users. Here there are particular limitations and difficulties with installing each tool, given the early stage of development reached. So in these tests we will not be testing the users’ capacity to install the tools themselves, but to use tools already set up for use. This is thus a controlled test environment, which was a pair of Web-connected laptops running Windows 7, and connecting to a demonstrator EPrints repository running the SWORDv2 extensions.

Materials. If this is a test solely of repository deposit, what is to be deposited? The aim is to provide users with content suitable for use with the new deposit tools, and to be used as a basis, initially, for exploring the features of the tools. Beyond that we don’t want to lead the user in terms of choice of deposit tool. Also, for comparative purposes, we introduced a task that involves using the native repository deposit interface. For subsequent deposit tasks the choice of deposit tool is left open for the user.

Given that we have a Word deposit tool, we provide Word documents for deposit. The file manager deposit tool is intended to be a simple and general-purpose tool that might be used to deposit materials considered unconventional in current repository collections. Images are perhaps the simplest case here and were provided in the test corpus. Also, as part of the test we invited users to bring their own content, as a way of motivating interest in particular features that users might have identified during the set test.

By the end of the test users would have deposited quite a large and diverse set of materials in the demonstrator repository. This is not a typical deposit scenario for current repositories, but the test seeks to anticipate new ways of working and deposit made possible by the tools and when such scenarios may not be unexpected. Even so, the extent of deposit in the time available for the test may be ambitious and complex, and in this sense could be seen as subjecting the tools to maximum stress.

Users. Who are the target users? They could be any members of an institution with a repository and who might need to deposit content. Since the new tools are intended to open new deposit scenarios, the users could be new or experienced repository users.

In the case of the DepositMO project we have a number of interested groups participating in the project committee, representing different repositories hoping to implement the tools, and academic subject groups representing authors with expanding needs for repository deposit. To be specific, our users were invited and coordinated by representatives for the e-Prints Soton and EdShare repositories, and the archaeology and chemistry departments at the University of Southampton. In addition, we had interest in the tools from the Kultivate project, a companion JISC repository deposit project, and we worked with two representatives of that project as well.

Since the number of users is small, 13 users in total across four user groups, the tests are sufficient to reveal usability issues with the tools, but to draw any further conclusions about repository deposit would be speculation.

Measures and outcomes. A user test needs to have a way to measure the outcomes. From a general perspective the purpose of repository deposit is to transfer a copy of the designated content to the repository in the most timely and efficient manner, to ensure that the integrity of the content is maintained through copying and transfer, and that it is sufficiently described to aid retrieval by a variety of queries.

In this test we focus on the first issue, the timeliness of deposit, to some extent on the description issue, and not at all on the integrity issue as that is not a function of the new tools but is left to existing repository processes.

In most use cases involving new technology or services it is better to measure what the user does rather than what the user thinks, although the latter can be helpful and revealing in the context of the former. So here we have a record of what the user does, in terms of the repository history for that user’s account, and allied to the history timings we independently timed, in quite a rough manner, how long it took to complete each task in the specified test process.

To discover what users thought of the tools we included short questionnaires in the test document, to be completed just before and immediately after the test process. The first questionnaire inquired about the user’s relevant experience with repositories, if any, and the second prompted their reactions to the test and the tools. During the test observers recorded more instinctive and spontaneous, perhaps less considered, reactions. Most users, apart from one, worked in pairs to provide the opportunity for these reactions to be vocalised, since otherwise the observers were not permitted to be directly involved in the test or to influence it in any way.

The test. Taking all the above factors into account we produced the test specification document. Users were invited, by the coordinators, to a test session at a specified time and place, as local to the users as possible. Four sessions were held, allowing up to 1.5 hours for the test each time. As already mentioned, users were encouraged to bring some of their own content for deposit. Other than that, users did not have to bring any equipment. Pre-installed laptops were provided for each user or pair, and they were not briefed in advance on the form of the test.

Apart from some introductory words by the test moderator, the test is intended to be self-contained and self-explanatory. The purpose of the introduction was to put users at ease, and to ensure that the setup and arrangements were sufficient to allow them to focus on the test and not be distracted.

In the next post we will begin to set out the instructions for performing the test as presented to the test users.

Posted in Uncategorized.

Tagged with , , , .


Repository usability review 3: new deposit protocols

This is one of a series of posts building towards a full paper on the use and testing of the repository deposit tools, specifically for deposit of in-progress work, developed in the JISC DepositMO project. In this post we continue and complete our review of repository usability studies, here considering repository deposit processes and protocols that increase the utility of deposit. If we have missed any relevant work that should be included, please leave a comment.

Looking forward, there have been glimpses of repository interfaces that might play a role for in-progress file deposit and management, where in-progress means as the work is written and created. Runner-up in the Developer Challenge at Open Repositories 2009 was a prototype called FedoraFS by Rebecca Koesar, who exposed Fedora as a desktop filestore using Fuse: “while only a command line prototype at this point the ease of overlaying a Graphical User Interface with file-folder icons is all but a done deal.”

At Open Repositories 2011 the same Developer Challenge was won by Repository as a Service (RaaS) based on the idea that with standard repository interfaces, to get data in and out the repository becomes a commodity that can be swapped. The entry demonstrated an Android mobile app that used SWORD to deposit photos into both DSpace and EPrints. A common interface was provided to access the items in the repository. Both EPrints and DSpace provided identical experiences because of the common interfaces.

Which brings us to SWORD (Simple Web service Offering Repository Deposit). The idea that repository deposit might be abstracted from repository software began in practice with SWORD in 2007. At the core of its proposition was, given the plethora of repositories and user interfaces, that users could choose a single interface for deposit in multiple repositories. It may thus be the single-most important development in repository user interfaces since the original repository softwares, but its impact is still more in principle than practice in terms of alternative interfaces that have attracted wide use. This may be due to a lack of interfaces, or lack of uptake, but it has not limited the number of potential use cases, as shown by Lewis, et al. (2012).

Or it could be due to limited functionality, which will be fixed by SWORD version 2, released in December 2011. We have written on this blog before about the key developments in SWORD v2, taking it from a ‘fire and forget’ deposit method that is limited in terms of what authors can do with their content after depositing in a repository, to a model where authors retain more control over their content and items can be created, updated, replaced, or deleted (CRUD) in the repository. SWORD v2 is the basis of DepositMO’s vision for in-progress deposit.

SWORD builds on AtomPub, the Atom Publishing Protocol. Many may be more familiar with Atom in the form of an RSS-like syndication protocol; AtomPub is the flip side, about pushing content into a dissemination resource rather than its receipt by readers (Snell 2006). SWORD 2.0 continues to build on AtomPub through the inclusion of the CRUD operations of AtomPub to enable the following kinds of interactions, described by the SWORD 2.0 Profile:

  1. Clients may create resources by sending compound resources, such as archive files (tar, zip).
  2. Workflows which may or may not include manual stages before deposited resources become available as web resources, are acknowledged and supported
  3. Clients may update or delete the compound resources or associated metadata

In the progression to profile 2.0, SWORD becomes more explicitly a deposit lifecycle standard: “Most of the enhancements in SWORD 2.0 are around closing the deposit loop. This deposit process is only a portion of the full content lifecycle and does not attempt to provide support for collaborative or distributed authoring environments or policy management; it is focused entirely on the process of moving content from one location to another.”

During consultation over the new profile the adoption of more powerful publication protocols was advocated, but these have not so far been included, leaving the profile specification to note: “For standards to integrate detailed content management operations it is recommended to look at OASIS CMIS (Organization for the Advancement of Structured Information Standards – Content Management Interoperability Services), or the Google Documents (GData) List API.” It was this aim of bringing more powerful content management features to repositories that led to the DepositMO extensions using the platform and flexibility that SWORDv2 created with reference to these other publication protocols.

A similar publishing protocol connecting content-producing tools and repositories for learning resources and metadata is the Simple Publishing Interface (SPI), which also uses AtomPub. The main difference between SWORD and SPI, according to Ternier, et al. (2010), is in the submission of metadata. “In SWORD, metadata is available in a package and thus submitted to the repository as a part of the resource. In contrast, the SPI model makes a clear distinction between metadata and content at submission time. The rationale for this strict separation comes from the SPI application domain. Where SWORD is primarily concerned with depositing data, SPI is also intended for application scenarios where only metadata is considered.”

We have presented in this series of three posts a sweeping review of practical work on the usability of repository interfaces, most notably the deposit interface. Broadly these studies have found little wrong with current ‘fire and forget’ deposit interfaces while in some cases making adjustments for the structure and volume of metadata collected at deposit. Detailed and critical evidence on whether deposit interfaces make a substantive difference to levels of deposit, however, is hard to find. If we are to move towards more sophisticated Web 2.0-like interfaces for repositories, providing more interaction with authors using new protocols such as SWORD v2 to capture work at an earlier stage of creation, then users and usability will have to become much more central to repository testing.

This concludes our three-part review of repository usability focussing on user deposit. The next post will start to report the results of user testing of the repository deposit tools developed in DepositMO.

Posted in Uncategorized.

Tagged with , , , , , , , .