Preview of the Application – Mockups Part 1
In order to bring our application a little bit closer to life we made some mockups to give a picture of how we imagined it would look like. We can divide this design in two major categories, the one introducing the user to the application inviting him to make an account that includes his profile choices and the one that covers the main activity of the users in the application, where they can browse, watch or upload videos.
In this first part we are going to describe 8 possible screens of our application.
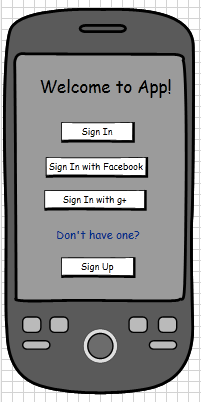
1) Initial Welcome Screen – Sing in/ Sign up
The User is welcomed to the application and in order to proceed he has to sign in if he has used it before or sign up if it is the first time he is using it. Some extra options are being offered here to sign in using an already existing account from some well known social networks like Facebook and Google+. This way he won’t have to create a completely new account and he could additionally share his activity in the app with his friends in the social networks. In case the user chooses to sing in through some social network, he will then have to provide his credentials for the site and give our app authentication to use some aspects of his account.
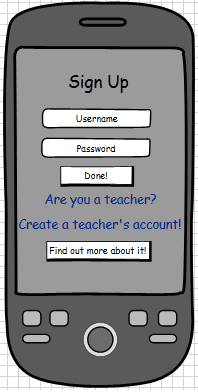
2) Create account screen
Considering it is the first time one uses the app, and he has picked to make a customised account for the app, he has to provide a desirable username and a password before proceeding to the next step. Another extra option is offered here especially for teachers, which is to create a teacher’s account that will give them more options when using the app. More about what happens when this choice is made can be found later on this post.
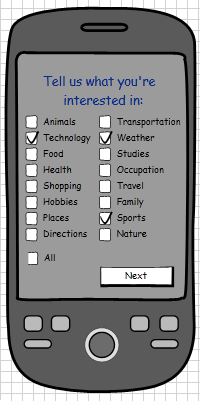
3) Filtering Interests screen
The next step after providing a username and a password will be to provide some insight on the user’s interests so that the app can filter videos when browsing to the topics that the user is mostly interested in learning and practicing. The topics given here are:
Animals, Technology, Food, Health, Shopping, Hobbies, Places, Directions, Transportation, Weather, Studies, Occupations, Travel, Family, Sports, Nature and an option that includes them All.
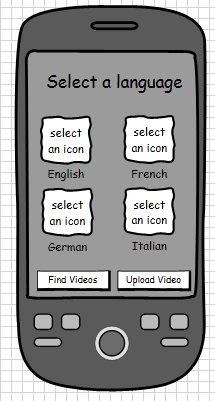
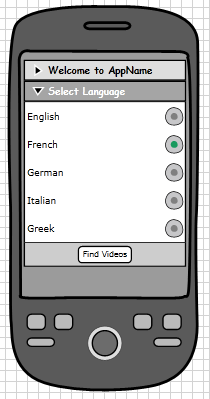
4) Language selection screen
After pointing out some topics of interest the user is asked to choose a language on which he would like to augment and practise his skills. Some of the languages given could be: English, French, German, Italian, Greek and so on. Here we present two alternative screens for this selection. The first one could be a visual one, where the user could choose by selecting a flag according to the language he is interested in and the other one some type of list where the user could choose the language. Preferably we would use the first one.
After selecting a language users are ready to start browsing relevant videos according to their choices or even start by uploading one!
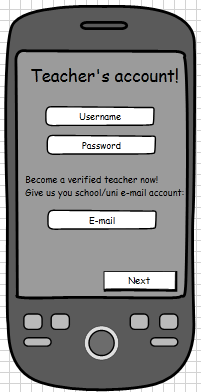
5) Teacher account creation
When someone chooses to create a teacher’s account then he is prompted to give a username and a password for his account to be created but he is also required to provide an e-mail address coming from some kind of an educational institute so that he can create an account where he will be verified as a teacher. Videos coming from verified teachers could be considered more accurate or informative by other users.
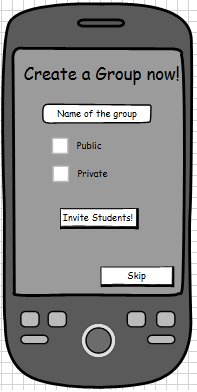
6) Create Groups screen
After having a teacher’s account users can create groups, where they can invite and interact with other users. The concept of this was for teachers to be able to invite students in their groups so that they can upload videos relevant to the day’s class and interact with the others on making them, watching ones the others have made and further comment or rate videos. When making a group a name is required for it and a choice concerning its privacy. Teachers can choose to make it public so that the content is visible to all users, or private so that only the people invited in it can access it. Then teachers should invite users to their group either by using their usernames in the application or by inviting them through their e-mail. If someone does not want to invite users the moment he creates the group he does not have to do it, he can skip this step, maybe upload some videos first in it and then invite users to contribute in it.
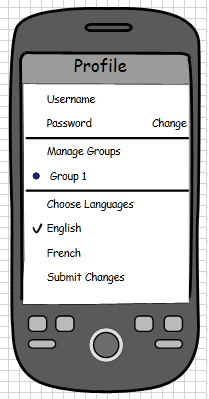
7) User Profile screen
The account a user creates and the choices that he makes at the beginning can be over-viewed and altered in the user’s profile page. There he could change his password to a new one, manage his groups, change the language he is currently learning and so on.
The screens presented here cover the first part that includes how a user starts using the app, by making an account and some choices that will customise his experience when using it.